12/31/2012

Zva Creative December DT Blog Hop!


Happy New Year to you! ZvaCreative and our talented NEW 2013 Design Team welcome you to our December blog hop where we officially welcome our new team members to our monthly hops! We are very excited about this year's team and are sure that you will be inspired by and love their work. Are you ready to hop along and get to know them better?
Today's Blog Hop begins at Zva Creative's blogBe sure head on over to check it out! You will also find a complete list of all the participating blogs there (in case there is a glitch along the way). 
As you know, Zva offers many beautiful color groupings of pearls, flowers and crystals.  If you like what you see along the hop you can find a list of stores and online retailers that sell Zva HERE.
I was very excited to be chosen as a Guest Designer for ZVA Creative in 2013! I am a huge fan of bling, and ZVA Creative's bling adds the perfect finishing touch to my projects! 
For my project today I decided to make a mini album out of toilet paper rolls using Authentique Paper's new Seasons: Winter petite collection. I loved the blues and deep purple colors in this collection and knew I could match some of my ZVA Creative bling to it perfectly! 

I took a couple different packs of bling flourishes and cut them apart in order to use both of the colors that I wanted. 


If you would like to play along with our design team, just follow along the blog path.  I am linking to one of the Zva designers and that designer is linking to the next and so on. Be prepared to beinspired along the way!
The Blog Hop starts today, December 31st and runs through midnight US Eastern Standard Time on Tuesday, January 1st.
***Prizes***
Hidden on FIVE of the designer's blogs is a Zva Creative prize package! Winners will be randomly chosen after the hop is over. All you need to do is leave a comment on this Blog Hop post... you do not need to leave a comment on each and every designer's blog post to qualify. However, the more times you comment along the blog hop path, the more chances you will have to win.

The 5 winners will be announced on Wednesday, January 2nd on Zva Creative's blogWe will do our best to notify each winner,but it's best if you can pop in to Zva's blog on Wednesday to see if you are a winner!
We also thought it would be more fun to add even more chances to win our blog hop prize!  To increase your chances of winning:
* Comment to let us know that you posted on your Facebook page about our hop (link to any of the blog hop posts)
* Comment to let us know that you "tweeted"about our hop (link to any of the blog hop posts)
* Comment to let us know that you asked your local store to carry Zva creative products.  If they already do, that's fantastic, maybe you can suggest other products that they don't carry.
*Hop over to Zva's facebook page and "like" our page or leave a comment there to tell us that you already do!

 The blog hop begins here at Zva Creative's blog. Your next stop is Jennifer Snyder. Enjoy!

Thank you for joining us!

P.S. Mark your calendar to join us again on January 28th for our next Zva design team blog hop!

12/22/2012

On the 9th Day of Christmas...

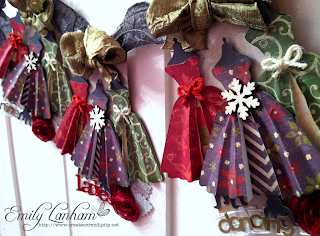
On the 9th Day of Christmas with DCWV... I saw 9 ladies dancing! 

I decided to interpret my day just like the song. When I was assigned "9 ladies Dancing" I knew exactly what I wanted to make! 

I reached for my Heirloom Christmas stack from DCWV and got to work on a little tag banner. 

I can't take credit for the adorable dress idea, I found the initial idea on Pinterest


Thanks for stopping by today! Make sure you stop by the DCWV blog every day to see what the design team has done for all 12 days of Christmas! 

12/21/2012

Do All Things with Love


I've been on a tp roll mini album kick here lately. I just love making them! This particular one I played with a lot of new products to create it. I just LOVE how it turned out! Perfect for Spring, Mother's day, or just every day photos. 

I used some new products that I received from Art Anthology on this cute little album. To paint the base (tp rolls), I used AA Sorbet in Sand Dune. I really love the sorbet, it's kind of like a thick paint with chunky glitter. Really pretty! I also used the sorbet on the little clear acrylic bird, the color that i used was Viridian. I really love this color and it brings out the pretty greens in this paper collection. Another AA product that I tried on this project was the colorations spray in "Juicy" it's just a mist but it's not shimmery, so it's a good way to dye ribbons or embellishments that are plain. I used it on the little orange bird and the orange ribbon flower. 

Isn't the paper collection that i used beautiful? I am not at all a fan of pastel colors. Spring is my least favorite season to craft simply because pastels don't work well with me. This paper however, I love. It's from the Sweet Blossom stack from DCWV. 

Of coarse, what mini album of mine wouldn't be complete without LOADS of ribbon fro May Arts! Seriously, May Arts has the best ribbon around, hands down. I think I'm kind of a ribbon snob now, I won't even look at the craft store ribbons! lol 


I also decided to use this beautiful paper for a layout as well. I had a few scraps from the mini album and I hate to waste pretty paper!

I love printing instagram pics from postalpix. 

I decided to use a little candid pic of my daughter and I. These little pics are always good for something! 


Lastly, I made a little card with some of the other scraps. I couldn't resist adding a little bird. 

Thanks for stopping by!

12/20/2012

Ribbonista Blog Hop- Day 4!


Welcome to the May Arts Ribbonista Blog Hop! If you came here from Gini's blog today, you're on the right track! If not, make sure you hop back to the beginning today and start at Christina's blog! If you haven't been hopping with us all week long, be sure to stop by the May Arts blog for the full hop order for each day this week and a chance to win some ribbon for yourself! 


I admit, I was stumped when trying to think of a project for this hop. By now, as you could only imagine, I am about Christmas'd out! One of my friends called me last week and pretty much saved the day! She asked if I had any Christmas themed hair accessories made that she could buy from me to wear to work... well... no... but I could surely make one! PERFECT! This was a little out of the ordinary and not my typical paper craft project, so I was ready to give it a try! Little did she know, I was not going to charge her for it, this was the perfect little Christmas gift for her! 

Have a friend, child, family member that loves hair accessories? Why not make them one for Christmas! Especially if you bought them clothes (I know I always dreaded clothes for Christmas as a child but now I welcome them with open arms!)... you can make an accessory to match! 

First, pick out some rosette ribbon. I used the sheer frayed flowers from May Arts (393-3-01). I like to get my rosettes and some other ribbons in white so I can easily dye them with mists. A new favorite mist of mine is the Color Shine by Heidi Swapp. It's a pretty stand-out mist because it gives more of a subtle iridescent shimmer rather than lots of glitter. For this project I used Sweet Cherry and Chartreuse Color Shine. 

Next, you will need to cut some circles out of felt to re-enforce your flowers and embellishments. Mine aren't the most perfect circles, but they work! 

If you want a super-frilly hair bow, you can add lace and leaves. I chose the lace with pearl center (384-34-09). It's one of my new favorites. So dainty! I also chose to add gold leaves (XL30) to go along with the Christmas theme. I glued all of these onto the felt circles.

Then I  glued the flowers on top of the embellishments on the felt circles. 

You can lay out your flowers and position them how you want them before actually gluing them together. 

Once you glue them, add an extra felt circle to the back, this is where your clip will go. 

Glue an alligator clip to the back. I added a strip of felt to help re-enforce the clip. 

You can also embellish. I added some pearl heart stick pins and some petaloo flowers on top. 

Here's my little cutie trying on the hair piece. 

Needless to say, my friend LOVED it! I have a feeling this won't be the last hair accessory that I make! 

Thanks for stopping by! Now hop right along and see what Marie has to share today! 

12/13/2012

DCWV/Hampton Art Holiday Blog Hop

Hello and welcome to day two of the two-day DCWV/Hampton art Holiday Hop! 
DCWV and Hampton Art are two companies that go above and beyond to provide a wide selection of products from classic, to vintage, to trendy and modern. So, when we decided to team up it was only natural that we would want to show you some variety. 
Day #2 of our hop is all about Modern! If you love trendy, cute and clean, or bold, sturated and artsy these ladies have created some beautiful projects to inspire you! 
Sara Andrews ( http://sarawandrews.com/ )
Thomisia Francois ( http://thomisia.blogspot.com/ )
Gretchen McElveen ( http://gretchenmac.blogspot.com/ )

If you have come here from Sara Andrews then you're on track! If not, you should go back to the DCWV blog and start the hop from there!
For my project today... I decided to do a little gift wrapping!


I think that the chevron pattern is pretty modern, so that was my inspiration for today. I recently got some Christmas gifts for my daughter's 3 pre-school teachers. They were smaller gifts so I thought these little bags would be perfect! 
I used the Heirloom Christmas stack from DCWV for my project... now this stack is a little vintage color-wise, but I think it does have a modern twist with the designs. This stack did have a chevron pattern in it so I picked that sheet to match with my chevron bag. I also added a piece of paper that had holly and leaves to kind of mimic that on the stamped image. I used the Holiday Tag stamp from Hampton Art, which is PERFECT for gift wrapping! 


And don't forget that there are PRIZES from both companies so be sure to
enter! Each time you comment on ANY of the blog hop posts, you will get an entry into the giveaways. So today alone you can enter 14 times if you left a comment on each blog post.

The next stop on the hop today is Britt Bass! Stop by her blog to see what she has in store!

12/07/2012

O Christmas Tree!

I decided that I wanted to do a beach/coastal type of tree this year. Even though I live in Ohio nowhere near a beach, the thought of being at the beach or anything beachy makes me happy.

 I went with burlap and pretty teal/blue colors for the overall look of my tree this year.

I found these pretty ornaments at Wal-Mart and they were the PERFECT color! The best thing... they are plastic and kitty proof! We have a kitty this year so I had to remember to not put anything glass on the tree. 

She's already been a naughty kitty this year. Can you spot her? I caught her yesterday on the stairs trying to knock the ornaments off the tree. 

To match the beautiful ornaments, I decided that I needed some bows. Of coarse, they are really hard to find in the colors that I chose this year, so I decided to make my own! 

I chose one of my favorite ribbons from May Arts. It's the Natural Burlap/Stripe Edge ribbon in Teal(406-15-04).

Making your own bows for the tree is so simple! All you need is ribbon (wired is the best so you can shape the bows), jewelry wire, and scissors.

First, tie a bow and cut the ends (you might want to heat set with a lighter or fray check). Then thread the jewelry wire through the back and tie it off. 

Now you have a perfect bow ready to go on your tree!

I also needed a tree skirt to match. Of coarse, this was impossible to find in the colors that I wanted. So I took to Pinterest... 

This tree skirt was too beautiful NOT to try! I love how it turned out! I will note, this is a project and a half! Not one to do in just a few days! 

To make your own tree skirt you will need 2-3 yards of each fabric (I chose a pretty teal fabric and some ivory colored burlap), Christmas tree skirt (cotton skirts are $3 at Wal-mart), Ribbon. 

Start by hot gluing fabric to the bottom of the tree skirt. You will need to fold the fabric over each time to give a ruffled look. 

Add a layer of burlap after the fabric.

Keep going by alternating fabric/burlap with each row. 

Instead of adding a tie, I added some bows from the burlap/stripe ribbon to match my tree bows. I don't like typing a skirt around the tree so I did it this way and just laid the ends of the tree skirt overlapping so the bows would show. 

Last, but not least... do you remember the little clothespin flowers that I posted a few weeks ago?

Here they are! PERFECT addition to my beachy tree! CLICK HERE for a full tutorial to make your own! 

Stop by the May Arts blog today to see Christmas Trees from all of the Ribbonistas! Also, they are offering a giveaway, so you don't want to miss out on that!

Thanks for stopping by!