Showing posts with label home decor. Show all posts

3/04/2014

May Arts Ribbon Retro Color Themed Craft Challenge

Welcome! If you haven't stopped by the May Arts Ribbon blog lately, you are in for a treat! This week the "Retro Color Themed" Craft Challenge was announced! If you haven't played along with one of these challenges yet, you MUST play along with this one! 

Here's why....
You get a sampling of these lovely ribbons to play with!!! The challenge- you combine 4 of them in a project. So easy & fun, right? 

As a Ribbonita, I got a change to play along with the challenge first.... just to provide inspiration for you :-)
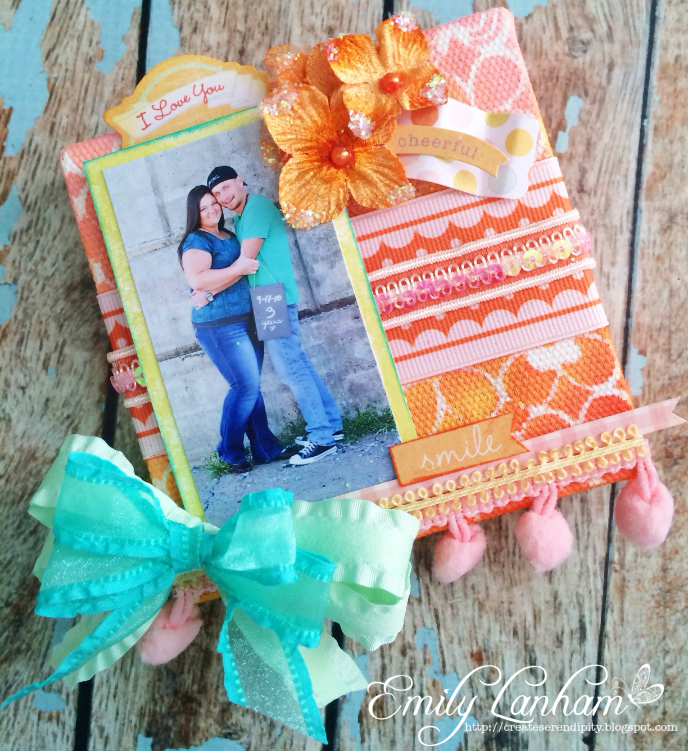
Here's my project! I had SO much fun playing along with this one! The colors are so great and they just scream Spring to me. 

I started with a 4x4 canvas, my ribbons, some Fireworks sprays and a Spring/Retro looking stencil. I never know where these canvas projects will go when I start them, but they are always fun to create. 

I started by laying my stencil over the canvas and just spraying away with my Fireworks. As you can see, in the middle the spray bled together a little which is normal on these canvases, it all depends on how heavy you spray. It can be covered up, but just be careful with spraying too much or you won't see the stencil marks.

I had SO much fun embellishing this one! I just HAD to use all of these yummy ribbons. 

I used a sticker sheet from Authentique's "Delightful" collection from last year... so I guess that's where my "Retro" comes in hand since the collection is now considered "old." hehe!

I wanted to tie it all together with this photo of my husband and I from our 3rd anniversary last year. The colors in the photo matched well with some of the ribbons, so over all, it all tied together nicely. This little gem is hanging front and center in my craft room! 

Good luck and I hope you all decide to play along! More inspiration projects can be seen today on the May Arts blog

Products Used:
May Arts Ribbon- NV18, DA12, 462-17, FP17, 350-58-94, 338-12
Authentique Paper- "Delightful" Collection 12x12 Details Stickers, 6x6 Bundle
Imagine Crafts/Tsukineko- Fireworks in Angel Pink, Tangelo, Dandelion
The Crafters Workshop- 6x6 Spring Fling Stencil
Canvas Corp- 4x4 Stretched Canvas
Petaloo- Orange Velvet Hydrangeas

11/23/2013

DCWV and Clear Scraps Blog Hop- Day 2

WI am excited to be a part of a Thanksgiving/Christmas Blog Hop with Clear Scraps from now through Monday! The DCWV Team have created some wonderful projects with the new Christmas stacks and Clear Scraps Acrylic Albums.There will be lots of inspiration for both upcoming holidays throughout the hop. Today's blog hop starts at the DCWV Blog

For my project today I used the new "Jolly Whimsy" stack. This stack is soooo cute! My favorite part.... it has PINK in it! I LOVE Christmas collections that add a little pink, it just makes things more fun! 

Instead of opting to create a traditional mini album, I wanted to do something a little different. I create mini albums all the time and I was hoping to get a cool home decor piece for my project today. 

I ended up with this really cute wall hanging. I had a lot of fun with this one, the colors just make me happy!

I added some stamping to the clear pages with some StazOn ink. 

Thanks for stopping by!

The hop order for today is: 

 Leave comments on each blog along the way to enter in our giveaway for 2 DCWV Goodie Boxes!

Products Used:
DCWV- Jolly Whimsy Stack, Red Gem Stickers
Clear Scraps- Acrylic All Mixed Up Album
May Arts- 462-17, 424-18-17, SM46, EA14, 419-14, 377-38-55
Imagine Crafts- StazOn Cotton White
Paper Smooches- Artisan Blocks

9/17/2013

Family Time Gift for Grandma

Today I wanted to share a project that I created for my grandma. Her birthday is in a few weeks and the Family time stack from DCWV was the perfect choice for my project. The papers in it are perfect and match her home decor. 


This project was really simple to make. I will show you how to re-create it! 

First, gather up some supplies. You will need some paper, photos, and a piece of masonite or ply board. I have had this stuff for a while, I purchased a large sheet at Lowe's and had it cut down into smaller pieces. This piece is 8.5 x 11"

Cut your first piece of paper to fit the board. Ink the edges. I used Versacolor ink from Imagine Crafts. I loved the bronze and gold in this ink pad, it went really well with this paper collection.

Next, glue a second piece of paper on top, but smaller in size. Add some Goosebumps from Imagine Crafts around the edges for a little texture.

You can also add Goosebumps to the elements on the page for more added texture.

Add photo and then embellish with flowers, ribbons, pearls, etc. 


This is my little family, my Grandparents, My mom (behind my grandpa) and her 2 sisters and brother. 

Thanks for stopping by today! 

Products Used:
DCWV- Family Time Stack
Imagine Crafts- Goosebumps Dauber top, Versacolor, Ink Blushers
Petaloo- Flowers
Want2Scrap- Bling
May Arts- RG25, SM10

7/12/2013

May Arts- Round 2 DT Submission

For my Round 2 submission, I wanted to do something very ribbon heavy. Normally, I would play with paper and ribbon, but sometimes, I like to try something different. Lat year, I made Flip Flops for my daughter, so I thought I would make her a little something again. She gets excited when I make things for her. There's something special about receiving handmade gifts. 

I decided to try my hand at some ribbon garland! My daughters room is very colorful, so I thought this would be a fun project. Little did I know how quick and easy this would be to create!

Start off by gathering lots of pretty ribbon. Scraps are also good to use for this project. 

For the base, I used May Arts Jute because it's very strong and would hold up well for this project.

Make a knot at the end of your jute string, be sure you leave a loop to hang it from.

Cut your ribbons by doubling them up, I used about 12 inch pieces (24 inches before doubling them over). 

Lay your ribbon as shown behind the jute. 

Pull the end of the ribbon through the loop.

Your ribbons should look like this.

Keep adding ribbons and alternating colors. When you are finished, tie the jute leaving a loop to hang the other end from. 

I also added ribbons to the sides. This is a great little home decor piece and it looks really cute hanging over my daughters bed! 


Products Used:
May Arts Ribbon- 
Pink- 444-58-22, 373-58-23, 443-58-22, RG-5-17, 437-22, BB22
Teal- 373-58-04, 377-38-15, 437-04
Purple- 377-38-47, BT47
Orange- DD28, EA28, FN28
Green- 437-46, 443-58-46, 392-58-46, EA46
White- 373-58-09, 377-38-01
Black- FS10, 392-58-10, 377-38-10, 390-58-10
Jute String- 363-09 

6/03/2013

May Arts Design Team Call Submission

Have you heard the news? May Arts is having a design team call! This has honestly been one of the best design teams that I've had the pleasure of being on, so re-applying wasn't even an option for me, it is was something that I HAD to do! I have enjoyed working with The Ribbon Lady (Bethney) as well as the rest of the talented team, and not to mention the FABULOUS ribbon! I'm hoping to get to come back for round 2! 

Here are a few of my favorite projects that I have created with May Arts Ribbon products. Seriously, it's the ONLY ribbon you should own, hands down the best on the market! 


And here is a link to one of my all time favorite tutorials that I did for May Arts (this was my Round 2 submission last year), I hope I make it to Round 2 this year! I have lots of ideas swirling around in my head! 

Thanks for stopping by today!

If you are looking for the May Arts DT Call, CLICK HERE

Good luck to everyone entering! 

5/27/2013

Summer Home Decor

I am loving the new Memento Luxe™ from Imagine Crafts®/Tsukineko®. For my AIR project today, I wanted to share another little embossing technique with Memento Luxe™.
I had some of my daughter's school photos from this year laying around and haven't framed them yet. I honestly wanted to do something creative with them and hadn't figured it out yet... until now!

I have a bunch of MDF type board laying around, I got a whole sheet for about $8 and had it cut down into smaller pieces. So I decided to use a 6x6 piece to make a photo wall hanging. 

I started out by covering the 6x6 board with paper. Next, ink the edges with Memento Luxe™ in White Wedding Dress. This one is my favorite because you can leave it plain and it gives a nice soft look, or you can emboss with it and it becomes transparent.

I embossed the edges with some Imagine Crafts®/Tsukineko® Iridescent embossing powder to give a nice subtle sparkle.

Next, I used the Memento Luxe™ in Danube Blue and applied the same embossing technique to the edges of my photo mat.

And then did the same to some wood buttons. 

Once you have all of the pieces finished, add them to your board, slap a photo on and add some ribbon to achieve a beautiful wall decor piece! 

Thanks for stopping by!

Products Used: 
Imagine Crafts®/Tsukineko®- Memento Luxe™ in White Wedding Dress & Danube Blue, Iridescent Embossing Powder, Sponge Dauber
Authentique Paper- Seasons: Summer collection
May Arts- 382-34-27

5/09/2013

Patriotic Door Hanger- Using Memento Luxe™ on Wood


Happy Thursday! I couldn't wait to share my AIR projects for this month! I am so ready for summer and nothing kicks off summer like a beautiful patriotic paper collection from Authentique! When I think red, white, & blue, I think Pride, Patriotism, Summer & bbq's! So I was ready to dive into this project with this collection and the new Memento Luxe™ from Imagine Crafts®/Tsukineko®. This is seriously my new favorite ink.


I'm going to show you how to create this project for yourself! It will make a great little decor piece for your home this summer!

Gather your supplies. You will need a wood surface to stamp on/ink up. I chose a wooden door hanger, these can be found at your local craft store.

First, spritz your wood surface with fireworks and/or walnut ink. Allow to fully dry or dry with a heat tool before moving to the next step.

Next, grab a stencil, a stipple brush (I used #4), and some Memento Luxe™ Mixed Media Pigment Ink. Begins daubing ink all over your wood surface.

I chose a stipple brush for this one simply because it gives more of a spray paint/airbrushed effect depending on how much ink/pressure you apply.

Next, it’s time to embellish. One of my favorite quick embellishments are ribbon flowers. I always keep them in white just so I can change the colors with Fireworks and Walnut inks.

Add the rest of your embellishments. I chose paper, stickers, and ribbons, but didn’t completely cover the image so bits and pieces of the stenciling are peeking out. It appears as if it were purchased that way!
Products Used:
Imagine Crafts®/Tsukineko®- Memento Luxe™ Mixed Media Pigment Ink in Wedding Dress, Stipple Brush #4™, Memento Fireworks: Summer Sky, Paris Dusk, Lady Bug, Rhubarb Stalk; Walnut Ink: Cornflower, Walnut
Authentique Paper™- Pride Collection

May Arts- RMC-01, 377-38-14, CC03, 392-58-14, 373-15-09, PR35
The Crafters Workshop- Star Shower Stencil TCW170
Wood Door Hanger