Showing posts with label altered items. Show all posts

2/20/2014

May Arts/ Stampendous Blog Hop!

Welcome to the May Arts/ Stampendous blog hop! If you are just stopping by today, be sure to check out the ENTIRE hop lineup on the May Arts blog

For my project today, I decided to alter this cute little chalkboard for my craft room. My daughter had this chalk board and it was cracked on the wood, so I wanted to doctor it up. You can find these chalkboards at your local craft store and they are fairly inexpensive.

To make this, you will need some of the Essentials from Stampendous. I used the Stack Arts Elements 5 kit. This one matches my craft room perfectly! 

First, take a piece of cardstock and cover the chalkboard leaving the outside wood edges to decorate. Spray the edges with some Spray Adhesive. BEWARE.... THIS IS MESSY! 

Sprinkle some of the mica fragments onto the outside edges where the spray adhesive has been applied. Set aside and let dry.

Next, it's time to embellish! 

I took some pieces from the Stampendous Kraftboard Stack Art Royal Heart Kit and added some glitter.

Next, I tied some pretty bows with my bow-it-all. 

Add the bows to the chalkboard along with a piece of ribbon to use for hanging, and Viola! How quick and easy is that?! This makes an adorable memo board to hang anywhere! 


12/19/2013

A "Jolly Whimsy" Pinspired Project!

Wow! Christmas is OFFICIALLY less than a week away! I've still been creating Christmas crafts simply because I got a late start. I also haven't finished shopping... but that's another story! For me, 2013 has been busy to say the least! 

Today I wanted to share a Pinterest Inspired project that was not an epic fail! Normally when I try to copycat a Pinterest project, it just doesn't turn out how I want it to. 

Here's the original Pin:
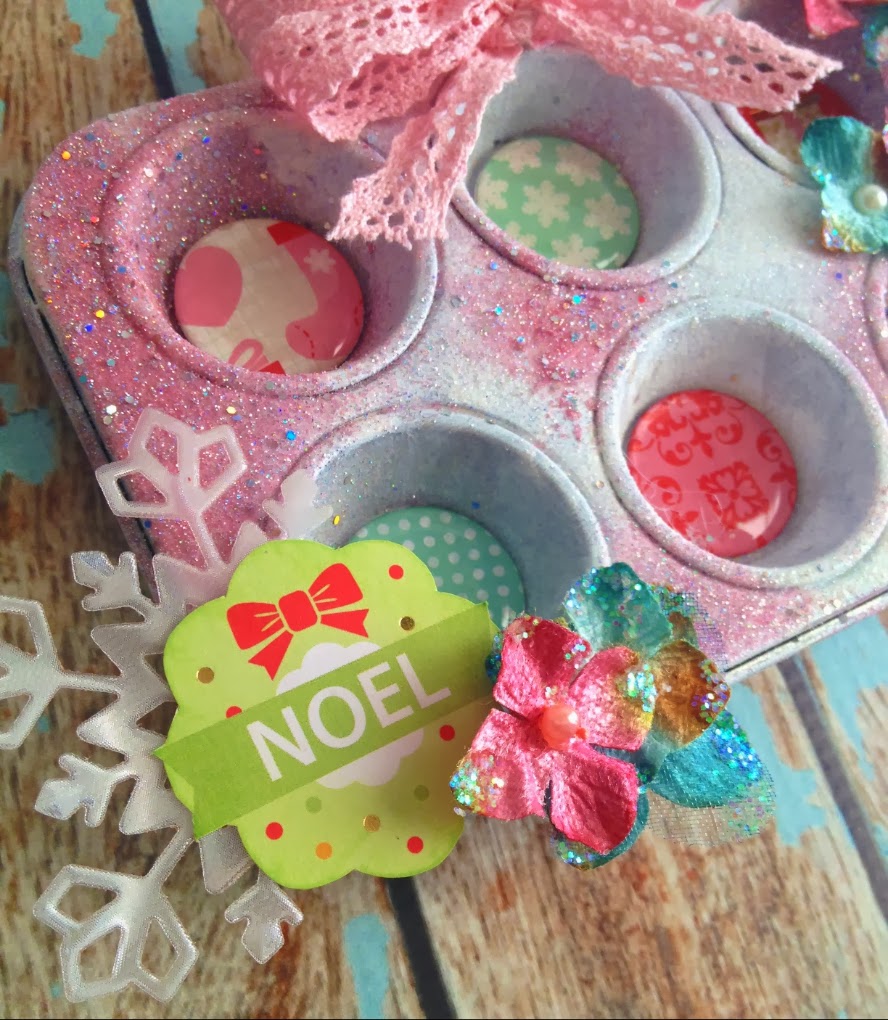
I have wanted to try an altered muffin tin for a long time! Last summer I was at an estate sale and picked up a couple of muffin tins. They have been sitting here ever since... so I decided that it was finally time to try my pinterest find!

I couldn't find the right color of spray paint so I decided to start back at square one... then I found this ADORABLE little muffin tin  that I had purchased from Jillibean Soup a while back. I could have used my larger muffin tins, but I got a new idea and wanted to use this one. 

One of my favorite Christmas collections this year is the "Jolly Whimsy" stack from DCWV. Pink + Christmas makes me one happy girl! I love when companies bring in non-traditional colors to their Christmas lines.

Here is the end result to my project.... See! Not a fail! I LOVE how it turned out!

I started out by painting my tin with enamel paint. I then added a little spray adhesive and some glitter... ok... A LOT of glitter. 

I added some pretty flowers from Petaloo and I found a little Vertigo snowflake left over from a previous project and added it in there too. 

I used my Round 25 tool and bubble caps from Epiphany Crafts to punch the circles for the tin, they fit PERFECT! How cool is that? 

 Thanks for stopping by today! Have a very Merry Christmas!

Products Used:
Epiphany Crafts- Round 25 tool & Bubble caps, Flower 20 tool & bubble capsDCWV- Jolly Whimsy StackJillibean Soup- Mini Muffin Tin
Petaloo- Velvet Hydrangeas
May Arts- 361-58-17, SM34
Imagine Crafts- Vertigo
Spellbinders- Snowflake Die

8/09/2013

A "Thrilling" Canvas with Authentique Paper & Imagine Crafts

Welcome! This month the Imagine Crafts AIRs are featuring Authentique Paper's new "Thrilling" collection in their projects. Lucky me, I am an AIR and a member of the Authentique Paper DT, so I wanted to make this post double the fun! 
I decided to play around a little. One of my favorite things to alter with Imagine Crafts products are canvases. I have an abundant amount of little canvases in my drawer just waiting to be inked. This was the perfect project for today, a little canvas makes a great piece of seasonal home decor! 

First, you will need to gather up some supplies. The canvas that I used is a 4x4 stretched canvas from Canvas Corp. I also used Authentique's "Thrilling" collection along with some Fireworks and NEW Memento Luxe from Imagine Crafts. 

I LOVE stencils from The Crafters Workshop. They are perfect to pair with sprays and inks. First, I took some Tingelo Fireworks spray and misted the canvas lightly. 

I wied the stencil and let the fireworks dry a little, then proceeded to add some Memento Luxe in a few places with a sponge dauber. This gives a nice smoky Halloweeny look. 

I didn't like the white edges, so I also added Memento Luxe to the edges.

This is what my canvas looked like after inking.

I decided that I wanted a little bit of sparkle, so I added some Sheer Shimmer Spritz in Frost to my canvas.

Go figure, I wasn't thinking, the ink began to bleed a little after spritzing, but I kinda like the look. Kinda looks eerie, right?

Now it's time to embellish! I wanted a little rosette to add to my canvas, so I made one with my scor-pal!

I also LOVE to use stickers as embellishments. Sometimes I don't need the back to be sticky, if you are the same way, you can de-activate the sticky by adding powder to the back. The cool thing about the Authentique stickers is that they are printed on a nice heavyweight paper so if you de-activate the sticky, it's just like having a little die cut to use. 

I added some fun tulle from Maya Road and then some stickers from the 12x12 sticker sheet.

When I make canvases, I never know what I'm going to do, I add and subtract little pieces here and there, but I always end up loving the end result! I think that the Petaloo webbed flowers & May Arts jute string were both perfect finishing touches to this piece! 


Here's a few more peeks for your viewing pleasure :-)


Products Used:
Imagine Crafts/Tsukineko- Memento Luxe: Tuxedo Black, Fireworks: Tingelo, Sheer Shimmer Spritz: Frost, Sponge Dauber
Authentique Paper- "Thrilling" Collection: 6x6 Bundle, 12x12 Details Sticker Sheet
The Crafters Workshop- TCW156 Cosmic Swirl
Canvas Corp- 4x4 Stretched Canvas
Maya Road- Tulle
May Arts- SM28, SM08
Petaloo- Mixed Textured Layers Flowers

5/27/2013

Summer Home Decor

I am loving the new Memento Luxe™ from Imagine Crafts®/Tsukineko®. For my AIR project today, I wanted to share another little embossing technique with Memento Luxe™.
I had some of my daughter's school photos from this year laying around and haven't framed them yet. I honestly wanted to do something creative with them and hadn't figured it out yet... until now!

I have a bunch of MDF type board laying around, I got a whole sheet for about $8 and had it cut down into smaller pieces. So I decided to use a 6x6 piece to make a photo wall hanging. 

I started out by covering the 6x6 board with paper. Next, ink the edges with Memento Luxe™ in White Wedding Dress. This one is my favorite because you can leave it plain and it gives a nice soft look, or you can emboss with it and it becomes transparent.

I embossed the edges with some Imagine Crafts®/Tsukineko® Iridescent embossing powder to give a nice subtle sparkle.

Next, I used the Memento Luxe™ in Danube Blue and applied the same embossing technique to the edges of my photo mat.

And then did the same to some wood buttons. 

Once you have all of the pieces finished, add them to your board, slap a photo on and add some ribbon to achieve a beautiful wall decor piece! 

Thanks for stopping by!

Products Used: 
Imagine Crafts®/Tsukineko®- Memento Luxe™ in White Wedding Dress & Danube Blue, Iridescent Embossing Powder, Sponge Dauber
Authentique Paper- Seasons: Summer collection
May Arts- 382-34-27

5/17/2013

Memento Luxe™ Self-Portrait Challenge Project

This month for one of our  Imagine Crafts®/Tsukineko® projects, we had to make a self-portrait challenge project. Typically, I would make something that wasn't an actual photo of myself, but I was playing with the new Memento Luxe™ and the brand new Irresistible collection from Authentique Paper and this is what I came up with...
Not only is it a portrait of myself (and my hubby on our wedding day), but the whole project represents me. From the paper with the music notes, to the quotes and the stenciling. I really love how this project turned out. I will show you how I achieved the results, it was a new technique for me! I've never embossed on a more vinyl type surface until now! 

Step 1- Pick out your supplies. I chose a canvas type picture frame and stencil to emboss with Memento Luxe™ ink.


Step 2- Tape your stencil to your project so it doesn’t move around on you. Take your Sponge Dauber™ and add Memento Luxe™Wedding Dress ink to your project. I dabbed it instead of smearing it so the ink wouldn’t smudge under the stencil.

Step 3- Add some clear embossing powder and apply heat with a heat tool.

Step 4- If your stencil wasn’t large enough, move it and do the same to the other side of your project until you reach your desired look.


Step 5- Add embellishments and Viola!


Products Used:
Imagine Crafts®/Tsukineko®- Memento Luxe™ Mixed Media Pigment Ink in Wedding Dress, Sponge Daubers™
Dreamweaver Crafts- LJ862 Mission Roses Stencil
American Crafts- Zing Clear Embossing Powder
Authentique Paper™- Irresistible Collection
May Arts-  390-58-09, 393-25-01, RMC-01, XL31
Petaloo- Velvet Hydrangeas: Black; Beaded Peonies: Black
Maya Road- Trinket Pins: Vintage Pearl Butterfly, Cream Heart
Maple Lane Press- 4x6 Frame


5/09/2013

Patriotic Door Hanger- Using Memento Luxe™ on Wood


Happy Thursday! I couldn't wait to share my AIR projects for this month! I am so ready for summer and nothing kicks off summer like a beautiful patriotic paper collection from Authentique! When I think red, white, & blue, I think Pride, Patriotism, Summer & bbq's! So I was ready to dive into this project with this collection and the new Memento Luxe™ from Imagine Crafts®/Tsukineko®. This is seriously my new favorite ink.


I'm going to show you how to create this project for yourself! It will make a great little decor piece for your home this summer!

Gather your supplies. You will need a wood surface to stamp on/ink up. I chose a wooden door hanger, these can be found at your local craft store.

First, spritz your wood surface with fireworks and/or walnut ink. Allow to fully dry or dry with a heat tool before moving to the next step.

Next, grab a stencil, a stipple brush (I used #4), and some Memento Luxe™ Mixed Media Pigment Ink. Begins daubing ink all over your wood surface.

I chose a stipple brush for this one simply because it gives more of a spray paint/airbrushed effect depending on how much ink/pressure you apply.

Next, it’s time to embellish. One of my favorite quick embellishments are ribbon flowers. I always keep them in white just so I can change the colors with Fireworks and Walnut inks.

Add the rest of your embellishments. I chose paper, stickers, and ribbons, but didn’t completely cover the image so bits and pieces of the stenciling are peeking out. It appears as if it were purchased that way!
Products Used:
Imagine Crafts®/Tsukineko®- Memento Luxe™ Mixed Media Pigment Ink in Wedding Dress, Stipple Brush #4™, Memento Fireworks: Summer Sky, Paris Dusk, Lady Bug, Rhubarb Stalk; Walnut Ink: Cornflower, Walnut
Authentique Paper™- Pride Collection

May Arts- RMC-01, 377-38-14, CC03, 392-58-14, 373-15-09, PR35
The Crafters Workshop- Star Shower Stencil TCW170
Wood Door Hanger