2/20/2014

May Arts/ Stampendous Blog Hop!

Welcome to the May Arts/ Stampendous blog hop! If you are just stopping by today, be sure to check out the ENTIRE hop lineup on the May Arts blog

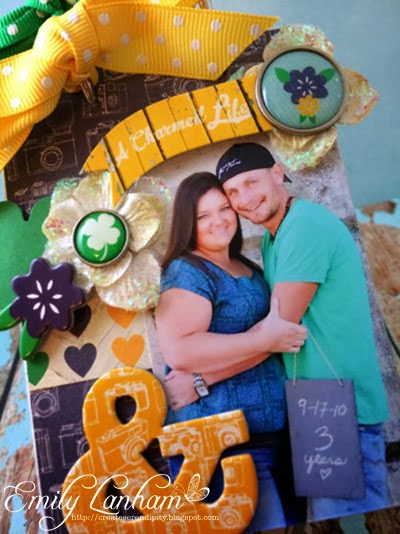
For my project today, I decided to alter this cute little chalkboard for my craft room. My daughter had this chalk board and it was cracked on the wood, so I wanted to doctor it up. You can find these chalkboards at your local craft store and they are fairly inexpensive.

To make this, you will need some of the Essentials from Stampendous. I used the Stack Arts Elements 5 kit. This one matches my craft room perfectly! 

First, take a piece of cardstock and cover the chalkboard leaving the outside wood edges to decorate. Spray the edges with some Spray Adhesive. BEWARE.... THIS IS MESSY! 

Sprinkle some of the mica fragments onto the outside edges where the spray adhesive has been applied. Set aside and let dry.

Next, it's time to embellish! 

I took some pieces from the Stampendous Kraftboard Stack Art Royal Heart Kit and added some glitter.

Next, I tied some pretty bows with my bow-it-all. 

Add the bows to the chalkboard along with a piece of ribbon to use for hanging, and Viola! How quick and easy is that?! This makes an adorable memo board to hang anywhere! 


2/18/2014

It's A Charmed Life!

It's my turn today on the Simple Stories blog and I have a super adorable mini album to share! First, let me start off by saying that I LOVE Simple Stories NEW "A Charmed Life" collection. This one is right up my alley, the colors are perfect, the elements are perfect, and I just adore all of the sweet sentiments. 

I have been hanging on to this little Maya Road Chipboard/Acrylic stand album for a while, but decided to finally put it in use. I needed a new piece to sit on my desk. 

My husband and I got anniversary photos taken this past year, so I wanted to have them on display for sure! I take every opportunity that I get to have a photo session. The end results are a fun time and amazing photos that last a lifetime. These did not let me down. We had a blast with this photos session! 

The sun was so bright that morning so we couldn't get a ton of photos down by the river, but I adore this one. That's the great Ohio River for those of you wondering.

Here's a few pages from the inside. I used some of the Sn@p cards on the top pages because I loved the sentiments and these little cards fit perfectly. 

Another element from this collection that I love are the little chipboard stickers. They give some nice dimension to projects and they are just adorable!

Here's the album from the side.... if I would have put anything else on it, I believe it would fall over! 

Thanks for stopping by today! 

Products Used:
Simple Stories: A Charmed Life 
6x6 Paper Pad #3722
Bits & Pieces #3729
Chipboard #3728
Brads #3727
Insta Squares #3730
Sn@p Cards #3723
Maya Road- Acrylic Album
Petaloo- Velvet Hydrangeas
May Arts- 5/8' Grosgrain Dots: DD57, DD15; 3/8" Metallic Velvet 377-38-55

2/17/2014

Live Life With The Volume on High!

I am LOVING all of the neon paper crafting supplies coming back in style! Being a child of the 80's I can really appreciate it.  Today I have a really fun card  to share using the new Radiant Neons from Imagine Crafts/Tsukineko. 
Here's how you can make this adorable card for yourself!
IMG_5710_pe
Step 1: Gather supplies.
IMG_5711_pe
Step 2: Stamp your images on white cardstock using a VersaMark pad.
IMG_5712_pe
Step 3: Add embossing powder and heat set with a heat gun.
IMG_5713_pe
Step 4: Begin to add the Radiant Neon ink on top of your image with an ink blusher. Add each color and blend them together at the edge lines so it looks smooth.
IMG_5714_pe
Step 5: Rub your stamped images wit ha paper towel to get the excess ink and make your images pop.
IMG_5717_pe
Step 6: Use the same technique on a cut out shape. Stamp sentiment on top with Memento Luxe.
IMG_5718_pe
Step 7: Add ribbons & sentiments and any extra embellishments. Adhere to a card base.
 IMG_5723_pe
Products Used:
IMAGINE Crafts/Tsukineko: Radiant Neon Pigment Ink in Electric Yellow, Electric Orange, Electric Coral, Electric Pink; VersaMark Stamp Pad; Embossing Powder; Memento Luxe in Tuxedo Black; Ink Blushers
Sweet Stamp Shop: Old School Rock Stamp Set
May Arts Ribbon: 3/8" Metallic Velvet Ribbon in Black (377-38-10)
Basically Bare: Arrows Embellies, Celestial Shapes Embellies
Black & White Cardstock

2/04/2014

May Arts New Release Week!


In case you've been living under a rock... I just wanted to do a quick little blog post letting you all know about the NEW release ribbons from May Arts! They are AMAZING! You can check them out HERE!

This week on the May Arts Blog, the Ribbonistas are featuring a variety of the new release ribbons to give some ideas on how you can use these ribbons in your projects. 

For my project, I created these adorable little headbands just in time for Valentine's Day! They are so simple to make! Stop by the May Arts Blog today to see the full tutorial and create some of these cuties for yourself!