12/19/2013

A "Jolly Whimsy" Pinspired Project!

Wow! Christmas is OFFICIALLY less than a week away! I've still been creating Christmas crafts simply because I got a late start. I also haven't finished shopping... but that's another story! For me, 2013 has been busy to say the least! 

Today I wanted to share a Pinterest Inspired project that was not an epic fail! Normally when I try to copycat a Pinterest project, it just doesn't turn out how I want it to. 

Here's the original Pin:
I have wanted to try an altered muffin tin for a long time! Last summer I was at an estate sale and picked up a couple of muffin tins. They have been sitting here ever since... so I decided that it was finally time to try my pinterest find!

I couldn't find the right color of spray paint so I decided to start back at square one... then I found this ADORABLE little muffin tin  that I had purchased from Jillibean Soup a while back. I could have used my larger muffin tins, but I got a new idea and wanted to use this one. 

One of my favorite Christmas collections this year is the "Jolly Whimsy" stack from DCWV. Pink + Christmas makes me one happy girl! I love when companies bring in non-traditional colors to their Christmas lines.

Here is the end result to my project.... See! Not a fail! I LOVE how it turned out!

I started out by painting my tin with enamel paint. I then added a little spray adhesive and some glitter... ok... A LOT of glitter. 

I added some pretty flowers from Petaloo and I found a little Vertigo snowflake left over from a previous project and added it in there too. 

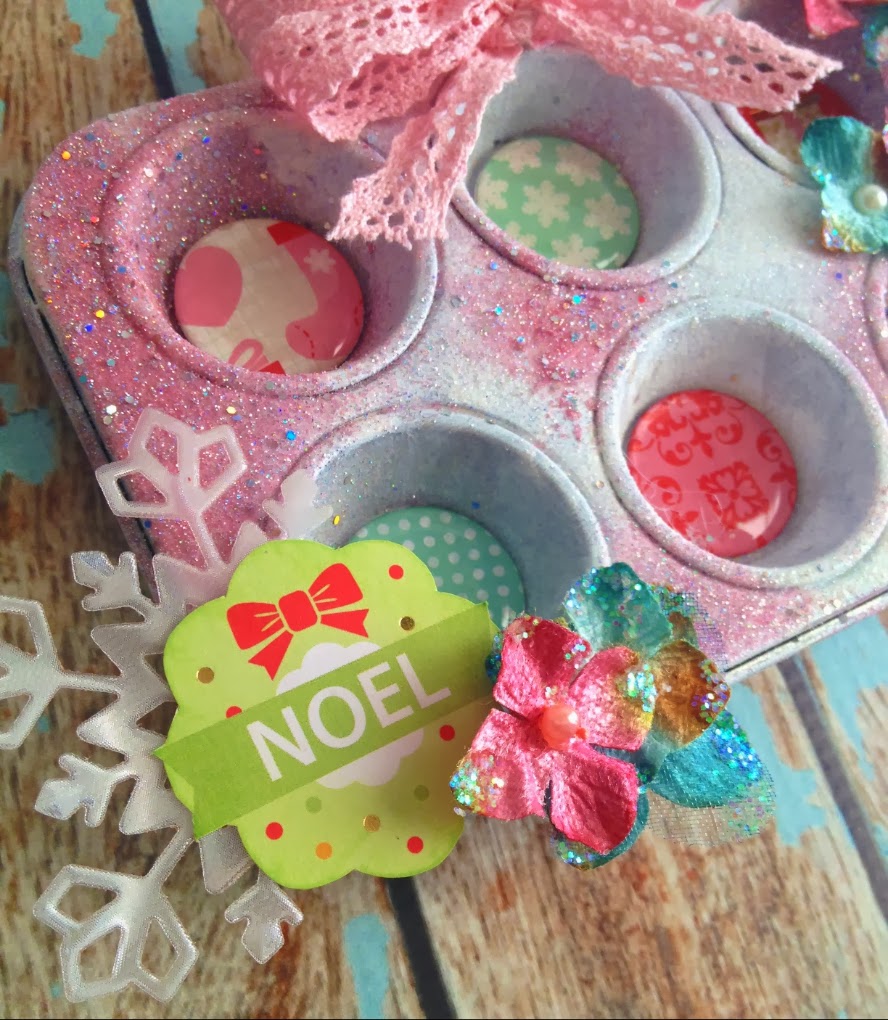
I used my Round 25 tool and bubble caps from Epiphany Crafts to punch the circles for the tin, they fit PERFECT! How cool is that? 

 Thanks for stopping by today! Have a very Merry Christmas!

Products Used:
Epiphany Crafts- Round 25 tool & Bubble caps, Flower 20 tool & bubble capsDCWV- Jolly Whimsy StackJillibean Soup- Mini Muffin Tin
Petaloo- Velvet Hydrangeas
May Arts- 361-58-17, SM34
Imagine Crafts- Vertigo
Spellbinders- Snowflake Die

12/12/2013

May Arts & Scrapbook Adhesives by 3L Blog Hop!

May Arts has teamed up with Scrapbook Adhesives for a week of inspiration!

For my project today I created this lovely little Winter card. I LOVE the 3D Foam Squares from Scrapbook adhesives! Whenever I use a lot of die cuts, I like to have lots of dimension and these little foam squares are perfect for adding dimension! They stick really well too! 

Some of my favorite go-to May Arts ribbons are the Jute String and the large Pom Poms. I use them on almost every single project that I create. 

Thanks for stopping by today! Don't forget to visit the rest of the Ribbonistas this week! 

Here are your stops this week:
Monday

Tuesday

Wednesday

Thursday

Friday


12/04/2013

May Arts Ribbonista Card Hop

Welcome to the Ribbonista Christmas Card blog hop! Be sure to check out the May Arts Blog to see all of the fabulous cards today! 

I created this fun card with the "Joyous" Paper Crafting Kit from Authentique Paper. I really love this kit because it came with these adorable file folders that easily double as cards! It also came with die cuts so creating this card was quick & easy! This kit is PERFECT for card making this holiday season! 

 A new love of mine is the large Pom Pom ribbon! This stuff is AWESOME! It gives a really nice finishing touch and dimension to all projects! Then again, ALL May Arts Ribbon gives a nice finishing touch! 

Isn't that bow PERFECT?! Well, my trick is simple actually... I used the new Bow-it-All from Zutter! If you love ribbon and want to make a perfect bow every time, you MUST own this tool! 

We've got PRIZES!
To win 3 spools from the May Arts Christmas Category, you simply need to post a comment on any stop along the way.

Products Used:
May Arts- 377-38-46, 462-09, 444-58-14
Authentique Paper- 
"Joyous" Paper Crafting Kit
Zutter- Bow-it-All
Petaloo- Flowers
DCWV- Gem Stickers

11/23/2013

DCWV and Clear Scraps Blog Hop- Day 2

WI am excited to be a part of a Thanksgiving/Christmas Blog Hop with Clear Scraps from now through Monday! The DCWV Team have created some wonderful projects with the new Christmas stacks and Clear Scraps Acrylic Albums.There will be lots of inspiration for both upcoming holidays throughout the hop. Today's blog hop starts at the DCWV Blog

For my project today I used the new "Jolly Whimsy" stack. This stack is soooo cute! My favorite part.... it has PINK in it! I LOVE Christmas collections that add a little pink, it just makes things more fun! 

Instead of opting to create a traditional mini album, I wanted to do something a little different. I create mini albums all the time and I was hoping to get a cool home decor piece for my project today. 

I ended up with this really cute wall hanging. I had a lot of fun with this one, the colors just make me happy!

I added some stamping to the clear pages with some StazOn ink. 

Thanks for stopping by!

The hop order for today is: 

 Leave comments on each blog along the way to enter in our giveaway for 2 DCWV Goodie Boxes!

Products Used:
DCWV- Jolly Whimsy Stack, Red Gem Stickers
Clear Scraps- Acrylic All Mixed Up Album
May Arts- 462-17, 424-18-17, SM46, EA14, 419-14, 377-38-55
Imagine Crafts- StazOn Cotton White
Paper Smooches- Artisan Blocks

11/22/2013

May Arts & Splash of Color Birthday Bow

It's time to get inky again with our friends over at Splash of Color!  If you haven't heard, May Arts is teaming up with Splash of Color every month to show you just how well their paints and May Arts ribbon go together!  This month we are featuring our ribbon with their pearl pens!

I created this cute little Birthday rosette today. My daughter's 6th birthday is Tuesday (where did the time go?!) so I wanted to make something cute for her. 

I added the #6 candle to kind of personalize it for my daughter. Cute, right? You can see that I added little dots with the pearl pen. What a great way to add dimension!

I also added some dots with the pearl pin to some of my lovely ribbons. These ribbons make the PERFECT tails for this rosette. This is a quick and easy project that you can throw together for that special birthday boy or girl!

Thanks for stopping by! Be sure to check out the May Arts blog to see other great projects and for your chance to win some prizes! 

Products Used:
May Arts- AF38, 382-34-27, NP31, JC17, SM09
Splsh of Color- Pearl Pens
Authentique Paper- Wishes Collection

11/21/2013

Spellbinders Platimun Party! Blog Hop


I’m excited to be part of the Spellbinders Platinum Party Blog Hop today!  I created this great project using Spellbinders Holiday and everyday dies, along with products from Imagine Crafts and Authentique Paper.


Since I got the Spellbinders Creative Book Pages, I have been itching to create another mini album! I was thrilled to get a chance to incorporate some of the new Christmas dies into my album, along with lots of other fun products! 

To make this, simply cut your shape from chipboard and patterned paper like shown above.

Glue your papers to the chipboard pieces (front and back.) Once glue has dried, ink the edged with coordinating inks.

Punch holes in the tops of the pieces and add large eyelets. Add binding rings through the eyelets to hold your book together. 

I created a few embellishments from my dies. I really loved the layered poinsettia die, so I cut one of those with the leaves and misted it with some Shimmer Spritz to give a nice little sparkle.

I cut the little snowflakes out of the new Vertigo from Imagine Crafts. This stuff is AWESOME! 

Add embellishments & ribbon and your album is complete! I always play with my embellishments before I glue them down. It's often hard to find the perfect spot so I try different pieces in different places. The snowflakes worked out perfectly peeking from behind some of my other embellishments. I love them!

There are several pages to this little album, I just love the layered shaped pages.

I embellished with my die cuts, some Petaloo Flowers, and die cuts from Authentique Paper's "Joyous" Paper Crafting Kit. Actually, I created this ENTIRE album with that little kit!

I always LOVE to add ribbons to my albums! May Arts Ribbons are the absolute best! Soooo many to choose from! 

Thanks for stopping by! Don't forget to hop over to the Imagine Crafts blog for more amazing projects! 

Products Used: 
Spellbinders: SF-055 Layered Poinsettia; LF-001 Creative Book Pages, SS-185 2013 Snowflake Pendant
Imagine Crafts:  Dew Drops- Brilliance: Rocket Red; Memento: Tuxedo Black, Pistachio; Shimmer Spritz: Sparkle; Ink Blushers; Vertigo: Taffea
Authentique Paper: "Joyous" Paper Crafting Kit
May Arts Ribbon: SE01, SM14, 392-58-14, EA9-14, KA56, 408-05-16, NP14, 377-38-10, AKB10
Petaloo: Flowers
DCWV: Gem Stickers

11/20/2013

The Ribbon Lady Is Tying The Knot! Blog Hop


Welcome to the May Arts Ribbonista surprise Blog Hop for Bethney (aka The Ribbon Lady). We recently heard the great news that Bethney got engaged and we wanted to put on a little something special for her. 

I've had the pleasure to work with Bethney on the May Arts DT for a little over a year now, but have known her for a couple of years. We've exchanged lots of stories- anything from our kids to our relationships, etc. When Bethney told me about her new relationship with this guy, Joe, I had a feeling she was in it for the long haul because he sure sounds like a keeper! 

 
I wanted to create something special for Bethney to add photos of her and her sweetie in, so I made this "Love" themed mini album with Authentique's Irresistible collection (which is one of the prizes you can win by the way... see details below.)

The black & white paper will be perfect for Bethney to match any of her photos with, engagement to wedding.

Thanks for joining us today! Bethney is very special to all of us Ribbonistas, so we hope you had fun celebrating with us today!

Hop right along down the list:
Emily Lanham <----- YOU ARE HERE

Now... We're ALSO offering up a huge prize pack of goodies to one lucky random person who goes over to the May Arts facebook page and wishes Bethney a HUGE Congratulations on her recent engagement!


11/14/2013

Give Thanks Fall Mini Album

I LOVE love love the Pumpkin Patch stack from DCWV! To me, Fall paper isn't fall paper without purple, and this one has the nice rich purple to tie it together. 

I decided to try a Fall mini album with this stack. I got the Creative Book Pages 1 & 2 dies from Spellbinders and felt the need to combine them for this fun mini! 

Aren't the colors PERFECT?

First, I started out by cutting a few of the book pages from the dies. I cut some chipboard (cereal boxes work GREAT for this!) and then cut 2 patterned papers for the front and back of each page. 

After I glued the album together, I chose some coordinating inks and inked the edges of my pages.

A mini album isn't complete without some lovely May Arts Ribbons adorning the binding rings!

For the flowers, I used a few different Spellbinders spiral flower dies. 

Here's a peek at the inside.


Thanks for stopping by today!

Products Used:
DCWV- Pumpkin Patch Stack
Spellbinders- Creative Book Pages 1 & 2, Bitty Blossoms, Spiral Blossom One
May Arts Ribbon- SE30, 373-58-47, AF44
Imagine Crafts/Tsukineko- Memento Dew Drops: Morocco, Bamboo Leaves, Sweet Plum, Rich Cocoa

11/13/2013

Autumn All-in-One Envelope/Note Card

Happy Fall ya'll! It's gotten quite cold here in Ohio and we've even seen our first snow already! Yes that's right, I said the dreaded S word! The crisp air had me excited to create Fall projects. 

I am in LOVE with DCWV's new Pumpkin Patch stack. The rich colors are perfect for this time of year! I created this cute little envelope/note card to share today. This was so easy to make! I'm going to share how you can create this yourself!

Start out by cutting your envelope template. You can use any square die and a decorative edge die. You will need 2 squares and one with a decorative edge for the envelope flap. 

Roll out some color onto your envelope with a brayer and Kaleidacolor pad. Ink edges with an ink blusher by coordinating colors from the ink pad. 

Tape the shapes together with washi tape. You may need to cut the shapes down a little so they fold inside each other like an envelope.

Cut the same shapes with patterned paper and adhere to inside.

Mist some bare embellishments with coordinating Fireworks colors. 

Glue ribbon to a smaller piece of paper and add to the bottom part of the envelope. Add between the flap and patterned paper as well. This way you can tie your envelope shut.

So simple, right? These would make perfect little place cards on a Thanksgiving table. 

You can even leave a little note inside for your guests and let them know why you are Thankful for them!

Thanks for stopping by today! 

Products Used:
DCWV- Pumpkin Patch Stack, Corrugate Naturals 6x6
Imagine Crafts- Kaleidacolor: Autumn Leaves; Fireworks: Potter’s Clay, Bamboo Leaves; Ink Blushers
May Arts- SM27, AF38
Basically Bare- Flower & Leaves Embellies
Epiphany Crafts- Round 14 tool & bubble caps
Speedball- Brayer
Spellbinders- A2 Matting Basics, Creative Book Pages