4/02/2014

May Arts Autism Awareness Day Blog Hop


Welcome to the May Arts Ribbon Autism Awareness Day blog hop! Be sure to check out the projects made by all of the ribbonistas today! Also, don't forget to stop by the May Arts Blog for your chance to win a great prize and learn a little more about why we do this hop each year! 


For my hop project, I wanted to stick with the puzzle piece theme. I had some cute little die cut puzzle pieces and decided to make a card. 


The sentiments on the puzzle pieces were perfect for this hop!


Thanks for stopping by! 

3/11/2014

Taylored Expressions March Key Ingredients Blog Hop

Hello and welcome!!  Today is my very first post as a Taylored Expressions DT member and we a re showcasing the March Key Ingredients and the March Stamp of the month.

Here's what all you get in the kit.... That's A LOT of god stuff, right?!

I created this fun little gift bag (among many other things) with this kit. The papers in the March Key Ingredients kit are from Simple Stories Daily Grind collection. I also used the March Stamp of the month- Take A Spin on this project along with the Coordinating die set, Spin It To Win It.

Now, it is time to hop on to Jen Shults' blog to see what she has put together with these awesome products.

Here is the full blog hop list:
Amy Crockett
Cassie Trask
Charmaine Ikach
Courtney Kelley
Emily Lanham
Jen Shults
Joan Ervin
Keia Shipp-Smith
Kendra Wietstock
Kerri Michaud
Monika Davis
Sankari Wegman
Shannon White
Shelly Mercado
Stephanie Kraft
Taylor VanBruggen
Tracy Clemente
Wanda Guess

3/10/2014

May Arts Ribbon & Penny Black Blog Hop


Welcome to the first ever May Arts Ribbon / Penny Black Blog Hop!  We have had so much fun teaming up with this amazing company and have loved creating with their products.  We have a full week of amazing inspiration ahead of us! Once you are done here, please visit the May Arts Blog and see all of the other great projects created by the lovely Ribbonistas!


I created this super sweet card for the hop today. I just LOVED the Summer Fun stamp set from Penny Black. So many different combinations could be used with this set, but I chose to go with the ice cream for my card today. 


I added some lovely matching ribbons from May Arts to make this card extra sweet! 

Thanks for stopping by!

Products Used: 
May Arts- 424-18-17, 393-25-17, 373-58-04
Penny Black- Summer Fun Stamp Set
Authentique Paper- Sweetness Collection
Petaloo- Velvet Hydrangeas

3/04/2014

May Arts Ribbon Retro Color Themed Craft Challenge

Welcome! If you haven't stopped by the May Arts Ribbon blog lately, you are in for a treat! This week the "Retro Color Themed" Craft Challenge was announced! If you haven't played along with one of these challenges yet, you MUST play along with this one! 

Here's why....
You get a sampling of these lovely ribbons to play with!!! The challenge- you combine 4 of them in a project. So easy & fun, right? 

As a Ribbonita, I got a change to play along with the challenge first.... just to provide inspiration for you :-)

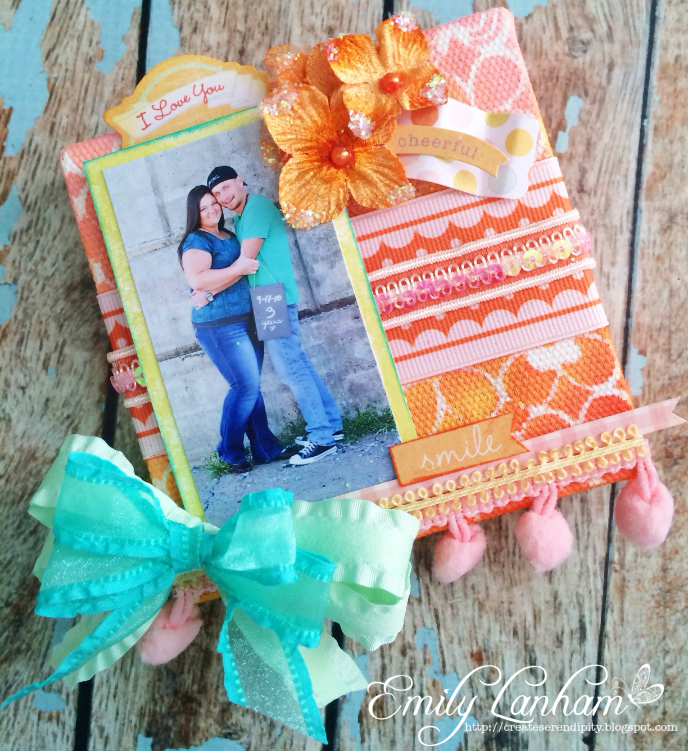
Here's my project! I had SO much fun playing along with this one! The colors are so great and they just scream Spring to me. 

I started with a 4x4 canvas, my ribbons, some Fireworks sprays and a Spring/Retro looking stencil. I never know where these canvas projects will go when I start them, but they are always fun to create. 

I started by laying my stencil over the canvas and just spraying away with my Fireworks. As you can see, in the middle the spray bled together a little which is normal on these canvases, it all depends on how heavy you spray. It can be covered up, but just be careful with spraying too much or you won't see the stencil marks.

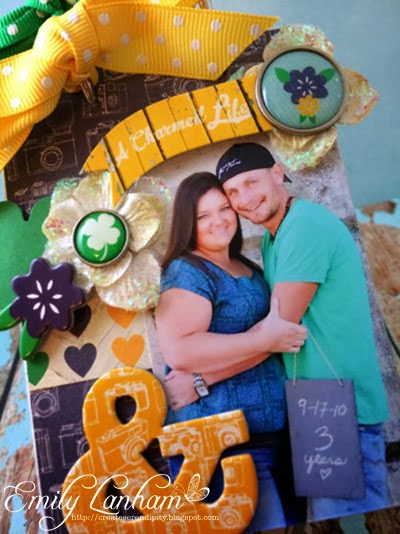
I had SO much fun embellishing this one! I just HAD to use all of these yummy ribbons. 

I used a sticker sheet from Authentique's "Delightful" collection from last year... so I guess that's where my "Retro" comes in hand since the collection is now considered "old." hehe!

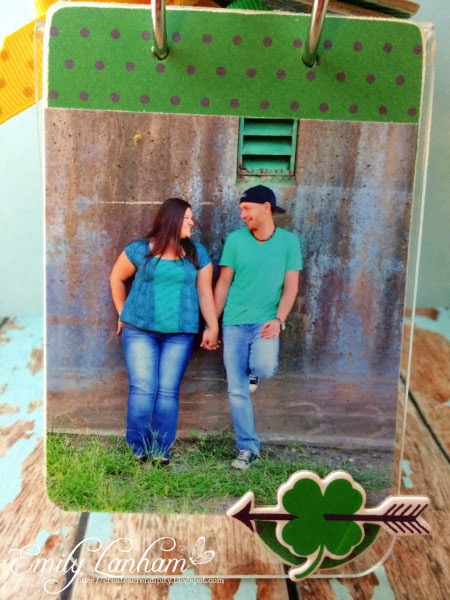
I wanted to tie it all together with this photo of my husband and I from our 3rd anniversary last year. The colors in the photo matched well with some of the ribbons, so over all, it all tied together nicely. This little gem is hanging front and center in my craft room! 

Good luck and I hope you all decide to play along! More inspiration projects can be seen today on the May Arts blog

Products Used:
May Arts Ribbon- NV18, DA12, 462-17, FP17, 350-58-94, 338-12
Authentique Paper- "Delightful" Collection 12x12 Details Stickers, 6x6 Bundle
Imagine Crafts/Tsukineko- Fireworks in Angel Pink, Tangelo, Dandelion
The Crafters Workshop- 6x6 Spring Fling Stencil
Canvas Corp- 4x4 Stretched Canvas
Petaloo- Orange Velvet Hydrangeas

2/20/2014

May Arts/ Stampendous Blog Hop!

Welcome to the May Arts/ Stampendous blog hop! If you are just stopping by today, be sure to check out the ENTIRE hop lineup on the May Arts blog

For my project today, I decided to alter this cute little chalkboard for my craft room. My daughter had this chalk board and it was cracked on the wood, so I wanted to doctor it up. You can find these chalkboards at your local craft store and they are fairly inexpensive.

To make this, you will need some of the Essentials from Stampendous. I used the Stack Arts Elements 5 kit. This one matches my craft room perfectly! 

First, take a piece of cardstock and cover the chalkboard leaving the outside wood edges to decorate. Spray the edges with some Spray Adhesive. BEWARE.... THIS IS MESSY! 

Sprinkle some of the mica fragments onto the outside edges where the spray adhesive has been applied. Set aside and let dry.

Next, it's time to embellish! 

I took some pieces from the Stampendous Kraftboard Stack Art Royal Heart Kit and added some glitter.

Next, I tied some pretty bows with my bow-it-all. 

Add the bows to the chalkboard along with a piece of ribbon to use for hanging, and Viola! How quick and easy is that?! This makes an adorable memo board to hang anywhere! 


2/18/2014

It's A Charmed Life!

It's my turn today on the Simple Stories blog and I have a super adorable mini album to share! First, let me start off by saying that I LOVE Simple Stories NEW "A Charmed Life" collection. This one is right up my alley, the colors are perfect, the elements are perfect, and I just adore all of the sweet sentiments. 

I have been hanging on to this little Maya Road Chipboard/Acrylic stand album for a while, but decided to finally put it in use. I needed a new piece to sit on my desk. 

My husband and I got anniversary photos taken this past year, so I wanted to have them on display for sure! I take every opportunity that I get to have a photo session. The end results are a fun time and amazing photos that last a lifetime. These did not let me down. We had a blast with this photos session! 

The sun was so bright that morning so we couldn't get a ton of photos down by the river, but I adore this one. That's the great Ohio River for those of you wondering.

Here's a few pages from the inside. I used some of the Sn@p cards on the top pages because I loved the sentiments and these little cards fit perfectly. 

Another element from this collection that I love are the little chipboard stickers. They give some nice dimension to projects and they are just adorable!

Here's the album from the side.... if I would have put anything else on it, I believe it would fall over! 

Thanks for stopping by today! 

Products Used:
Simple Stories: A Charmed Life 
6x6 Paper Pad #3722
Bits & Pieces #3729
Chipboard #3728
Brads #3727
Insta Squares #3730
Sn@p Cards #3723
Maya Road- Acrylic Album
Petaloo- Velvet Hydrangeas
May Arts- 5/8' Grosgrain Dots: DD57, DD15; 3/8" Metallic Velvet 377-38-55

2/17/2014

Live Life With The Volume on High!

I am LOVING all of the neon paper crafting supplies coming back in style! Being a child of the 80's I can really appreciate it.  Today I have a really fun card  to share using the new Radiant Neons from Imagine Crafts/Tsukineko. 
Here's how you can make this adorable card for yourself!
IMG_5710_pe
Step 1: Gather supplies.
IMG_5711_pe
Step 2: Stamp your images on white cardstock using a VersaMark pad.
IMG_5712_pe
Step 3: Add embossing powder and heat set with a heat gun.
IMG_5713_pe
Step 4: Begin to add the Radiant Neon ink on top of your image with an ink blusher. Add each color and blend them together at the edge lines so it looks smooth.
IMG_5714_pe
Step 5: Rub your stamped images wit ha paper towel to get the excess ink and make your images pop.
IMG_5717_pe
Step 6: Use the same technique on a cut out shape. Stamp sentiment on top with Memento Luxe.
IMG_5718_pe
Step 7: Add ribbons & sentiments and any extra embellishments. Adhere to a card base.
 IMG_5723_pe
Products Used:
IMAGINE Crafts/Tsukineko: Radiant Neon Pigment Ink in Electric Yellow, Electric Orange, Electric Coral, Electric Pink; VersaMark Stamp Pad; Embossing Powder; Memento Luxe in Tuxedo Black; Ink Blushers
Sweet Stamp Shop: Old School Rock Stamp Set
May Arts Ribbon: 3/8" Metallic Velvet Ribbon in Black (377-38-10)
Basically Bare: Arrows Embellies, Celestial Shapes Embellies
Black & White Cardstock

2/04/2014

May Arts New Release Week!


In case you've been living under a rock... I just wanted to do a quick little blog post letting you all know about the NEW release ribbons from May Arts! They are AMAZING! You can check them out HERE!

This week on the May Arts Blog, the Ribbonistas are featuring a variety of the new release ribbons to give some ideas on how you can use these ribbons in your projects. 

For my project, I created these adorable little headbands just in time for Valentine's Day! They are so simple to make! Stop by the May Arts Blog today to see the full tutorial and create some of these cuties for yourself! 

12/19/2013

A "Jolly Whimsy" Pinspired Project!

Wow! Christmas is OFFICIALLY less than a week away! I've still been creating Christmas crafts simply because I got a late start. I also haven't finished shopping... but that's another story! For me, 2013 has been busy to say the least! 

Today I wanted to share a Pinterest Inspired project that was not an epic fail! Normally when I try to copycat a Pinterest project, it just doesn't turn out how I want it to. 

Here's the original Pin:
I have wanted to try an altered muffin tin for a long time! Last summer I was at an estate sale and picked up a couple of muffin tins. They have been sitting here ever since... so I decided that it was finally time to try my pinterest find!

I couldn't find the right color of spray paint so I decided to start back at square one... then I found this ADORABLE little muffin tin  that I had purchased from Jillibean Soup a while back. I could have used my larger muffin tins, but I got a new idea and wanted to use this one. 

One of my favorite Christmas collections this year is the "Jolly Whimsy" stack from DCWV. Pink + Christmas makes me one happy girl! I love when companies bring in non-traditional colors to their Christmas lines.

Here is the end result to my project.... See! Not a fail! I LOVE how it turned out!

I started out by painting my tin with enamel paint. I then added a little spray adhesive and some glitter... ok... A LOT of glitter. 

I added some pretty flowers from Petaloo and I found a little Vertigo snowflake left over from a previous project and added it in there too. 

I used my Round 25 tool and bubble caps from Epiphany Crafts to punch the circles for the tin, they fit PERFECT! How cool is that? 

 Thanks for stopping by today! Have a very Merry Christmas!

Products Used:
Epiphany Crafts- Round 25 tool & Bubble caps, Flower 20 tool & bubble capsDCWV- Jolly Whimsy StackJillibean Soup- Mini Muffin Tin
Petaloo- Velvet Hydrangeas
May Arts- 361-58-17, SM34
Imagine Crafts- Vertigo
Spellbinders- Snowflake Die