2/17/2013

A Little Denim Goes A long Way!

Today is my day to share a cool technique for Imagine Crafts! Are you ready to get inky?

I made this cool mixed media type tag by just pulling out some supplies and playing around. My assignment was to create something with the new "Denim" kaleidecolor pad.... and as you all know from my previous post this month, I was always iffy about the kaleidacolor because I didn't have a brayer (and I still don't own one)... Well, you can do so much more with this ink pad than run a brayer over it! Check it out! 

Gather your supplies. You will need a kaleidacolor pad, ink blushers, #8 manila tag, versamark pad, clear embossing powder, background stamp. 
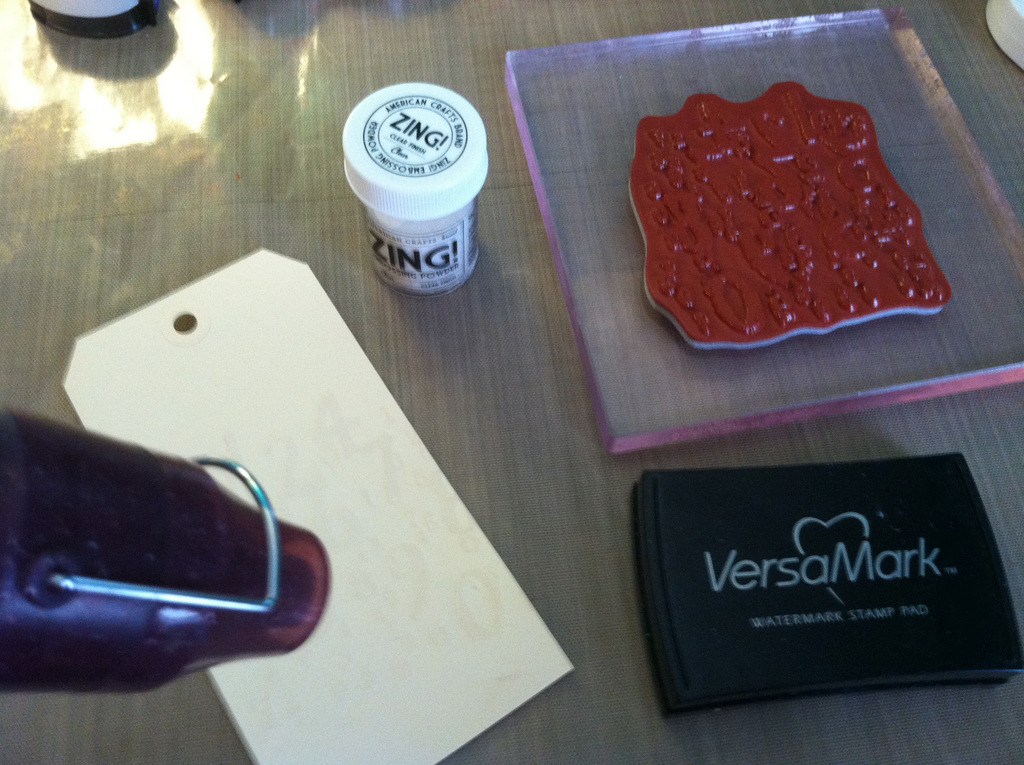
Stamp with your background stamp onto the blank tag using a versamark watercolor stamp pad. Add clear embossing powder and set with a heat tool.  

Begin rubbing color onto your tag using ink blushers and your kaleidacolor stamp pad. This creates a resist effect when rubbing the color over the embossed image. 

Rub the excess ink off of the embossed part of your project.  

You can spread ink all over your tag to get a cool marbled effect.  

Tape a template down over the part of the tag that isn’t embossed. Spritz with fireworks.  

Once you rub off the excess fireworks and it is completely dry, go around the edge of your tag with a Memento ink pad.  

Embellish with stickers & ribbons. 

I couldn't help but add some stickers from Authentique's "Original" collection because I have a feeling it might have played a little part in the making of this amazing new kaleidacolor pad! 


Products Used:
Imagine Crafts-Kaleidacolor- Denim; Memento- Paris Dusk; Fireworks- Paris Dusk; Versamark; Ink Blushers
 Authentique Paper- Original Collection: 12x12 Details Stickers
Unity Stamp Company- SMAK Kit: Dec 2011
The Crafters Workshop- 6x6 Template – Mini Swiss Dot (TCW246s)
May Arts- PR35, 363-33, 345-33, AW03, 377-38-33
#8 Manila Tag

Clear Embossing Powder

2/12/2013

HeARTful Thinking

Valentine's Day is just a few days away... are you tired of seeing hearts plastered everywhere yet? In my opinion, you can never have enough hearts! 

I was inspired by all of the hearts and Love in the air... so I decided to make myself a heart covered clipboard! Who really likes those old dull & boring clipboards anyway?

I've even made up a quick little tutorial so you can make your own! Check it out! 

First, gather up some supplies. I chose the Street Lace stack by DCWV. It's not really a "Love" themed stack, which is good because you can use your clipboard all year round! You will also want a punch, I used a large heart shaped punch. 

Punch out several hearts from different patterned papers. You might want to ink the edges to make them stand out a little. 

Start gluing your hearts onto your clipboard. Alternate patterns and layer as you go along. 

Keep gluing and layering hearts until you cover the entire clipboard. Don't worry about the hearts that overlap the edges. 

Once your clipboard is covered, be sure to let the glue dry completely before moving on to the next step. 

 Once the glue has dried, flip the clipboard over and run an xacto knife down the edge to trip off the excess. 

I sanded the edges a little then inked around the perimeter  After that, I covered the entire clipboard with Sparkle Mod Podge... because I wanted to have a pretty shimmer. Once the first coat dried, I added a second just to be safe. You can also use regular Mod Podge, it doesn't HAVE to sparkle. 

Once the mod podge is dry, add some pretty ribbons to the clip part of the clipboard. 

There you have it! A quick & easy DIY clipboard! 

2/09/2013

Your Tiki Hut... or Mine?

Recently I was faced with a bit of a challenge.... I had to use one of the Imagine Crafts Kaleidacolor pads on a "themed" project.... only problem... I don't have a brayer! How on earth could I use this ink pad with no brayer?!

Well... I overcame the challenge and made this beautiful card... with no brayer! 

If you don’t have a brayer or blending markers, don’t worry! You can still get a similar effect using the kaleidacolor and memento ink pads!


Gather your supplies. You will need a kaleidacolor pad, ink blushers, plain white cardstock, and a template. 

Tape your template to the white cardstock. Begin by daubing and ink blusher into the first color on the kaleidacolor pad, rush over top of the template. For more vivid colors, go over more than once. Repeat with each color in the stamp pad until you reach a desired look. 

Once you are finished, carefully peel the template off of the cardstock. You can cut around the image and adhere it to a card or other project. 

In the meantime, take some fireworks spray and spritz some embellishments. I like to use white ribbons because I can always match them to my projects. 

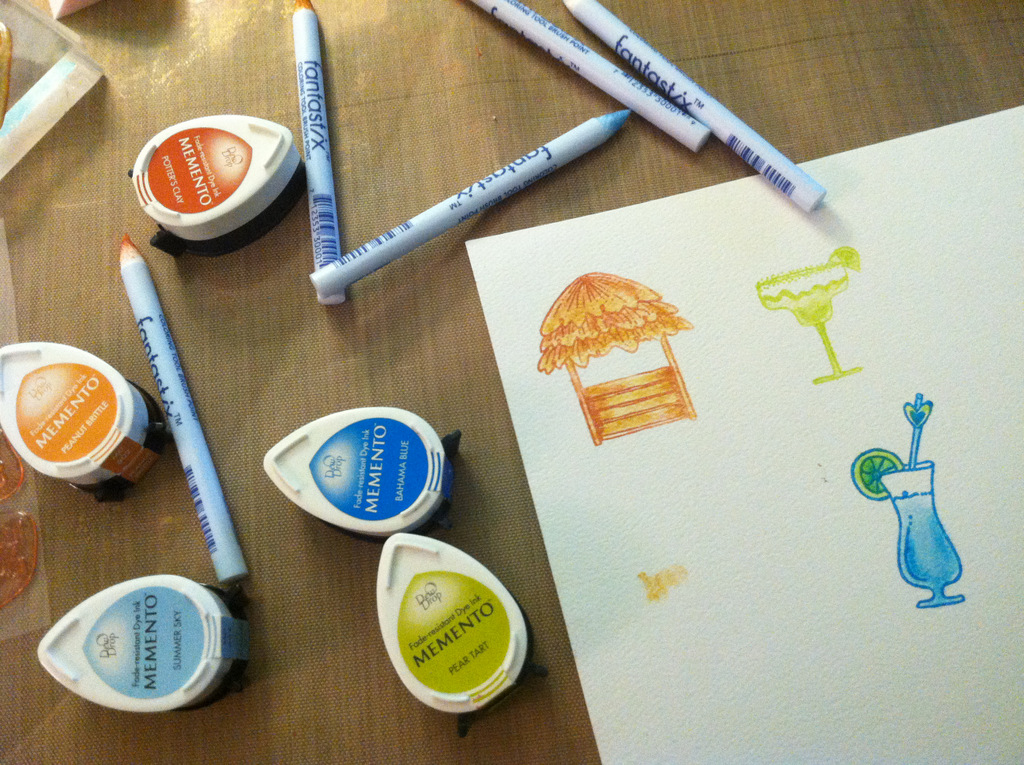
Next, we are going to color with some fantastix! Gather up some stamps and Memento dew drop pads. 

Stamp your image onto white cardstock. Dab your fantastix brush onto a lighter shade of ink and begin shading in your image. You can go back in with a darker color and sort of blend the colors together. You can also use water with your fantastix to blend the colors. 

Once you get all of your images stamped and colored, cut them out and add to your card. 

Once you have all of your pieces, you can add them to your project with dimensional dots. 


Products Used: 
Imagine Crafts- Kaleidacolor- Tahiti; Memento- Bahama Blue, Summer Sky, Pear Tart, Peanut Brittle, Potter’s Clay; Ink Blushers; Fantastix
 Market Street Stamps- Tiki Time (MSS-22-NHR)
The Crafters Workshop- 6x6 Template – Mini Swirly Garden (TCW325s)
Maya Road- Super Star Pins- Gold
May Arts- 382-34-46, 373-58-04, 392-58-46, 393-3-01
Core’dinations – Cardstock


2/05/2013

Ribbonista Valentine's Day Blog Hop- Day 2!

Welcome to the May Arts Ribbonista Blog Hop! If you came here from Christina's Blog today, you're on the right track! If not, make sure you hop back to the beginning today and start at the May Arts Blog! If you haven't been hopping with us all week long, be sure to stop by the May Arts blog  for the full hop order for each day this week and a chance to win some ribbon for yourself! 

I made a cute little Valentine Tag to share today.  This would make a great Valentine project to make with the kids or even a great one to give to that special someone this Valentine's Day! 

Start with a #8 manila tag and some mists. Fold the end of the tag (about 2 inches) and staple sides to form a pocket. 

Spritz entire tag with multiple colors of  mists (I used Imagine Crafts Fireworks in Angel Pink, Rose Bud, Lady Bug) and let dry or apply heat gun to speed dry time. 

Ink edges of tag with ink (Memento- grey flannel) and an ink blusher or dauber. 

Punch shapes from patterned paper (tags, regular & scalloped circles). Ink edges of all shapes. 

Take a plain white ribbon rosette (393-25-01) and spritz with the multiple colors of mist. Dab with paper towel to absorb some excess ink, sit aside to dry.

Cut the ribbon from behind the rosette once it is dry, add ribbons to the tag. You can also add your paper embellishments and some coordinating stickers.  


Thanks for stopping by! Now hop right along and see what Sandy has to share today! 

Products Used:
May Arts- 393-25-01, AW17, RT14, JP10, 384-58-01
Authentique Paper- Lovely Collection: Patterned Paper, 8x12 Elements Stickers
Imagine Crafts- Fireworks:Angel Pink, Rose Bud, Lady Bug Memento Dew Drops: Grey Flannel

2/04/2013

Love is the Key Note...


I've been really bad about updating my blog lately... I blame it on the Winter blah's. I've made quite a few projects lately for some of the companies that I design for, but after blogging on company blogs, I forget to blog it on my own blog! 

However, I did want to share this particular mini album that I made. I LOVE it. This album was displayed in the May Arts booth at CHA-W and featured on the Authentique Paper blog last week. 

I really love Authentique's Lovely collection. When I decided to make this mini album, I knew that was the perfect collection to use. Lots of rich & pretty colors and the perfect modern/vintage Valentine theme! 

Here's a peek at the rest of my album including some of the inside pages:

To see the full blog post including some tips & tricks, please visit the Authentique Paper blog. 

Products Used:
Authentique Paper- "Lovely" Paper-Crafting Assortment Kit
Petaloo- Darjeeling Dahlias, Darjeeling Mini Daisies
May Arts- 393-25-01,  392-58-14, EA09, RT14, KA20, 390-58-10

1/28/2013

Zva Creative January Blog Hop!

Happy New Year to you! Zva Creative and our talented 2013 Design Team welcome you to our January blog hop! We are very excited about month's hop and are excited to share our new work with you!
 Today's Blog Hop begins at Zva Creative's blog! Be sure head on over to check it out! Since many of us live in different time zones around the world, you will find a complete list of all the participating blogs there (in case there is a glitch along the way). 
 As you know, Zva offers many beautiful color groupings for pearls, flowers and crystals.  If you like what you see along the hop you can find a list of stores and online retailers that sell Zva HERE.

For my project today, I had originally planned on creating a lovely Valentine's Day project... but I came down with the flu and haven't felt super creative this past week.... so I'm sharing one of my projects that I made for CHA a few weeks ago, an Easter themed mini album! 

I created this mini album using Authentique Paper's new Easter collection, "Hope" and some beautiful ZVA Creative bling! 

Here's a peek at some of the inside pages:


If you would like to play along with our design team, just follow along the blog path.  I am linking to one of the Zva designers and that designer is linking to the next and so on. Be prepared to be inspired along the way!
The Blog Hop starts today, January 28th and runs through midnight US Eastern Standard Time on Tuesday, January 29th.
***Prizes***
Hidden on FIVE of the designer's blogs is a Zva Creative prize package! Winners will be randomly chosen after the hop is over. All you need to do is leave a comment on this Blog Hop post... you do not need to leave a comment on each and every designer's blog post to qualify. However, the more times you comment along the blog hop path, the more chances you will have to win. 
The 5 winners will be announced on Wednesday, January 30th on Zva Creative's blog. We will do our best to notify each winner, but it's best if you can pop in to Zva's blog on Wednesday to see if you are a winner! 
We also thought it would be more fun to add even more chances to win our blog hop prize!  To increase your chances of winning:
* Comment to let us know that you posted on your Facebook page about our hop (link to any of the blog hop posts)
* Comment to let us know that you "tweeted" about our hop (link to any of the blog hop posts)
* Comment to let us know that you asked your local store to carry Zva creative products.  If they already do, that's fantastic, maybe you can suggest other products that they don't carry.
*Hop over to Zva's facebook page and "like" our page or leave a comment there to tell us that you stopped by. 
 The blog hop begins here at Zva Creative's blog. I'm the last stop on the hop, so please make sure you didn't miss anyone along the way! Enjoy!
Thank you for joining us!

1/23/2013

May Arts & CardMaker Magazine Blog Hop!

Welcome to the May Arts/ CardMaker Magazine blog hop! If you came from Dee Dee's blog, you're on the right track! If not, be sure to start back at the beginning by visiting The CardMaker Magazine blog!

For my card, I thought I would stick with the upcoming Valentine's Day theme... so I worked with the "Lovely" collection from Authentique Paper. 

I tried a new technique that I learned at CHA last week... but it didn't turn out how I envisioned when I added it to my card...

First, take your ribbon (I used EA09 which is very similar to seam binding) and tape off sections with washi tape. 

Next, spray your ribbon with your favorite mist. The washi tape should create a mask and leave sections of your ribbon plain. Mine didn't work... I think the mist went through this particular washi. The technique DOES work though. I tried it at CHA and it turned out really neat. I need to invest in some thicker washi. I would assume this would work with painters tape or masking tape, you just want to be sure to use a tape that will peel off of your ribbon and not leave sticky residue. 

Another good tip... if you have white ribbon and need a desired color- use mists! I buy a lot of my ribbons in white or cream just so I can get some use out of my mists and match colors to other embellishments. 

May Arts will be giving away 4 spools of lovely ribbon (winners choice)... all you have to do is comment along the way! 
Now hop along to Erin Thiem's blog for more inspiration! 

Products Used:
May Arts- EA09, XL16, 393-25-17
Authentique- "Lovely" 12x12 & Details Stickers
Heidi Swapp- Color Shine-Tinsel