5/27/2013

Summer Home Decor

I am loving the new Memento Luxe™ from Imagine Crafts®/Tsukineko®. For my AIR project today, I wanted to share another little embossing technique with Memento Luxe™.
I had some of my daughter's school photos from this year laying around and haven't framed them yet. I honestly wanted to do something creative with them and hadn't figured it out yet... until now!

I have a bunch of MDF type board laying around, I got a whole sheet for about $8 and had it cut down into smaller pieces. So I decided to use a 6x6 piece to make a photo wall hanging. 

I started out by covering the 6x6 board with paper. Next, ink the edges with Memento Luxe™ in White Wedding Dress. This one is my favorite because you can leave it plain and it gives a nice soft look, or you can emboss with it and it becomes transparent.

I embossed the edges with some Imagine Crafts®/Tsukineko® Iridescent embossing powder to give a nice subtle sparkle.

Next, I used the Memento Luxe™ in Danube Blue and applied the same embossing technique to the edges of my photo mat.

And then did the same to some wood buttons. 

Once you have all of the pieces finished, add them to your board, slap a photo on and add some ribbon to achieve a beautiful wall decor piece! 

Thanks for stopping by!

Products Used: 
Imagine Crafts®/Tsukineko®- Memento Luxe™ in White Wedding Dress & Danube Blue, Iridescent Embossing Powder, Sponge Dauber
Authentique Paper- Seasons: Summer collection
May Arts- 382-34-27

5/25/2013

I {Heart} Summer Tags

Woo hoo! The weekend is here! It's not just any ordinary weekend... it's Memorial Day weekend... aka the "unofficial" kickoff to summer! 

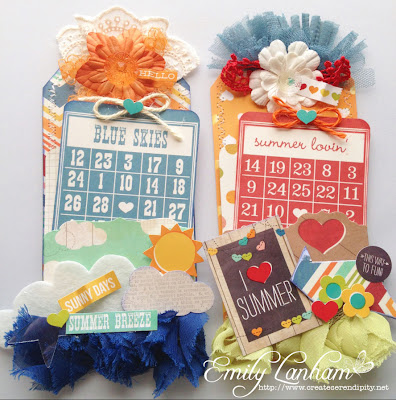
I decided to create some fun & festive Summer themed tags with the new Simple Stories I {Heart} Summer collection to share today. I love making tags, but I never know what to do with them. Sure, you can attach them to a gift, they get ripped off and thrown aside... after spending so much time creating a single tag, it really deserves more attention! 

I added some of the Simple Stories Sn@p! pockets to my tags to give them a dual purpose. 

These tags can be used as a regular tag, attached to a card, used as a card themselves, used as a gift card holder, or you could even add a little card or note and slip it into the pockets.

I used the standard #8 shipping tags and then covered them with patterned paper & stitched around them with my sewing machine. 

I also thought that adding lots of pretty trims would make these tags fun. 

Thanks for stopping by today! Enjoy your weekend! 

Products Used:
Simple Stories- I {Heart} Summer collection- #3202 Fundamentals Cardstock Stickers, #3203 Expressions Cardstock Stickers, #3204 Sunshine & Laughter, #3209 Hello Summer, #3221 Bingo Cards/Summer Stripe , #3223 Sn@p Pockets! 
Basically Bare- Celestial Shapes,  Arrows
May Arts- 363-09
Petaloo- Flower Layers
Websters Pages- Sparklers, Bloomers, Trim
Inkssentials- #8 Shipping tags

5/24/2013

May Arts Ribbon/Scor-Pal Blog Hop


Welcome to the May Arts Ribbon/Scor-Pal Blog Hop! If you came here from Toni Storie's Blog, you're on the right track! If not, make sure you start at the beginning today on Charlene Driggs blog so you don't miss a single project! 

For my project today, I created a mini album using ONE single sheet of double sided 12x12 paper. I wish that I could take credit for this idea because it is soooo creative and simple to make, but I scrap-lifted from my dear friend Shellye McDaniel (with her permission to re-post this fabulous tutorial). I thought a little patriotic mini would be perfect to kick off this holiday weekend!

To create this mini album you will need one 12x12 sheet of double sided pattern paper, a scor-board, scor-tape, and some ribbon. 

I chose Authentique Paper for this project because of the texture and nice thick quality. You will need to scor your paper at 3", 6", 9"

Then turn your paper sideways and scor at the 6" mark.

With a paper trimmer or scissors, cut your paper down the middle all the way up to the 3" mark. Be sure to leave this last little bit attached. 

Your paper should look like this. 

Add scor-tape so your paper looks exactly like this. Remember, the patterned side that you want on the front and back cover should be facing you, the back side will be the pattern on your inside pages.

Peel off the tape backing and fold/adhere EXACTLY as follows... be careful, this part is a little tricky: 
Adhere #2 to #3. 
Fold down and adhere #1 to #5. 
Adhere #6 to #7. 

Now you will have this. 

Add another piece of Scor-tape to the front and back cover.

Add ribbon. 

Tie & embellish. Fill with photos and you are finished! 

Here's the cover of my mini album with some embellishments. 


Thanks for stopping by! Be sure to stop by every blog in the hop and leave a comment for your chance to win 3 spools of your choice from May Arts Ribbon and a Scor-Pal for yourself! Now hop on to see what Tya Smith has in store for you today!

Products Used:
May Arts Ribbon- 410-15-14, 363,09
Scor- Pal- 12x12 Scor-Pal, 1/4" Scor-Tape
Authentique Paper- Pride Collection

5/20/2013

DCWV & Therm O Web Summer Lovin Blog Hop!


Welcome to the DCWV/Therm O Web Summer Lovin’ Blog hop.

Today, the design teams from DCWV and Therm O Web have brought together all the things we love about summer! The designers are have combined paper from DCWV’s Sunday Afternoon and Everlasting Love stacks, together with a variety of adhesives, mists and other fantastic products from Therm O Web!    

If you have come here from Karla's Blog then you're on track! If not, you should go back to the DCWV blog and start today’s leg of the hop from there!

For my Summer Lovin' project, I thought I would continue with the theme I've had this past week on my blog... Wedding! Love is in the air and it's definitely Wedding season! Do you have a friend or family member that you know who is getting married this summer? I've got a fun step-by-step tutorial today how to make some adorable wedding favors!

I'm sure you've sen these little containers before, right? They look like sour cream containers, but can be filled with anything that you like. At first I thought these looked complicated, but they are so easy to make! 


First, cut your piece of paper to 4.25 x 5.5 inches. 

Add some adhesive to the sections where the arrows are drawn above. 

Roll your piece of paper to form a tube, press firmly so adhesive will stick.

Close one end by pressing firmly so adhesive will stick.

Take a paper crimper to the end that is sealed. 

This will be your result. Add candy, bird seed, or whatever you want to put in the container to the open end. 

Seal by pressing firmly on the open end and crimp with paper crimper. 

If you want to embellish yo can. I absolutely love to add flowers to everything and this time, I wanted to give them a nice subtle sparkle. The Therm O Web Glitter Dust is AMAZING and it's one of my favorite products right now. 

For my project I used DCWV's Everlasting Love stack. This stack is great. The nice neutral tones allow you to keep your projects neutral or jazz them up with any splash of color that you desire to add. 

For my project, I thought pink was the perfect addition. 

Be sure to visit all the blogs today, and leave comments for your chance to win!  Two lucky readers will win a set of 3 stacks from DCWV, and an additional reader will receive an amazing gift pack from Therm O Web!   The more you comment, the more chances you have to win!

Next, hop right along and see what Julia has in store for you today!

5/18/2013

Love is In The Air!

Woo hoo! I'm Guest Designing on the Sweet Stamp Shop Blog today! My SWEET friend Nicole (owner and designer of SSS) asked me if I could feature an older (but very popular) SSS set today, so I grabbed the stamp set and started thinking of ideas. 

When I first looked at the Sentimental Birds stamp set, I think oh, yes, I can make a sympathy card with this! Not today! I wasn't feelin' sympathy. So I decided to break out the new "Irresistible" paper collection from Authentique Paper. It IS the beginning of wedding season after all, right?! 

Here's what I came up with!

I had one of my wedding photos left over from another top secret project that I was working on with this paper collection as well as some scraps... so I grabbed a piece of MDF type board that I had cut and went to town! 

This project is one that needs to be displayed on a plate stand since it's just a flat piece of board, but it makes a very elegant decor piece.  It's a very nice & inexpensive wedding/anniversary gift idea! 

I just love the little sentiments in this stamp set. So petite but yet so perfect! 

I had some more scraps, so I also decided to make a little card. 

Aren't those little birds darling? I think they go perfectly with the Love/Wedding/Anniversary theme! 

The great thing is that you can do SO much more with this stamp set! Don't forget to stop by the Sweet Stamp Shop and pick yours up today! 

Thanks for stopping by today!

Products Used:
Sweet Stamp Shop- Sentimental Birds Stamp Set
Authentique Paper- Irresistible Collection
Maya Road- Heart Trinket Pins
ZVA Creative- Pearls

5/17/2013

Memento Luxe™ Self-Portrait Challenge Project

This month for one of our  Imagine Crafts®/Tsukineko® projects, we had to make a self-portrait challenge project. Typically, I would make something that wasn't an actual photo of myself, but I was playing with the new Memento Luxe™ and the brand new Irresistible collection from Authentique Paper and this is what I came up with...
Not only is it a portrait of myself (and my hubby on our wedding day), but the whole project represents me. From the paper with the music notes, to the quotes and the stenciling. I really love how this project turned out. I will show you how I achieved the results, it was a new technique for me! I've never embossed on a more vinyl type surface until now! 

Step 1- Pick out your supplies. I chose a canvas type picture frame and stencil to emboss with Memento Luxe™ ink.


Step 2- Tape your stencil to your project so it doesn’t move around on you. Take your Sponge Dauber™ and add Memento Luxe™Wedding Dress ink to your project. I dabbed it instead of smearing it so the ink wouldn’t smudge under the stencil.

Step 3- Add some clear embossing powder and apply heat with a heat tool.

Step 4- If your stencil wasn’t large enough, move it and do the same to the other side of your project until you reach your desired look.


Step 5- Add embellishments and Viola!


Products Used:
Imagine Crafts®/Tsukineko®- Memento Luxe™ Mixed Media Pigment Ink in Wedding Dress, Sponge Daubers™
Dreamweaver Crafts- LJ862 Mission Roses Stencil
American Crafts- Zing Clear Embossing Powder
Authentique Paper™- Irresistible Collection
May Arts-  390-58-09, 393-25-01, RMC-01, XL31
Petaloo- Velvet Hydrangeas: Black; Beaded Peonies: Black
Maya Road- Trinket Pins: Vintage Pearl Butterfly, Cream Heart
Maple Lane Press- 4x6 Frame