11/30/2012

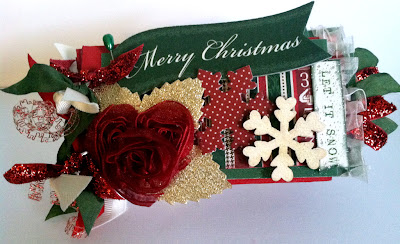
Once Upon A Christmas TP Mini Album


Have you stopped by the May Arts blog this week? LOTS of great inspiration projects from the May Arts team using Little Yellow Bicycle products! 


I was really excited when I saw this collection! Isn't it beautiful?!


I made this adorable little mini album using LYB Once upon a Christmas collection. Make sure you stop by the May Arts blog for more details and a step-by-step tutorial to make your own! 

11/28/2012

Handmade Holiday TP Roll Album

This week, Simple Stories is having a promotional blog hop week with Epiphany Crafts. I LOVE both companies very much, so I was quite excited about this! 

For my project, I decided to make one of my toilet paper roll mini albums. I really enjoy making these. They are oh so cute and the perfect size for gift giving! 

I especially love these type of albums because you can add little tags to stick out the open ends. 

For this project, I used the Handmade Holiday collection from Simple Stories. I just love this collection. It really screams "Hometown Christmas" to me and has a nice primitive feel. I also used the Round 14 shape studio tool from Epiphany Crafts. This is one of my favorite shape tools because it's so versatile. I used it with the Handmade Holiday Fundamentals cardstock stickers to make button centers for my flowers. Of coarse, I also added TONS of beautiful ribbons from May Arts. You really can't go wrong there! 

Thanks for stopping by today! 

11/19/2012

May Arts/Helmar Blog Hop- Day 1

Welcome to the May Arts/Helmar blog hop! If you came from Carisa's blog today, you're on the right track!  If not, make sure you start at the beginning of the hop with Charlene's blog! You don't want to miss a single stop as we are bringing you tons of inspirational projects today featuring May Arts ribbon and Helmar adhesives! 

For my project today, I was inspired by my lovely friend, Angie Blom. She made a similar project over the summer, I loved them so much that I decided to try my hand at it and put my own twist on it. 

I needed to get a jump start on Christmas Ornaments this year, so this was the perfect excuse! What? These don't look like Christmas Ornaments to you? Well, yes, I am not going traditional... I'm going to do a beach themed tree! I'm so excited about it, but beachy ornaments are almost impossible to find here in Ohio, so I have to make my own this Christmas! 

Of coarse, my all time favorite beachy paper collection is Authentique's "Fresh" collection. I matched up a few ribbons to it to use, one being the large silver leaves (because I knew I was making flowers) from May Arts (XL31) and I also grabbed some twisted burlap (363-09) because it's goes with my coastal theme. I also grabbed some clothes pins. I happened to stumble across a large bag at an estate sale for a couple dollars while I was in Chicago this summer. I knew they would come in handy sometime! Of coarse, I needed glue as well, so I reached for my "hot glue in a bottle" aka Helmar's 450 quick dry adhesive. 

First, start off by finding a nice flower cut file or die. I opted to use my Silhouette Cameo with a 3D flower cut file from the Silhouette store. I lined up 4 different patterned papers on my mat so I would have a variety of flowers. 

One you have your flowers cut, you can ink the edges to give a little shading to your flowers. It just looks pretty to ink/distress them. I always reach for my Memento inks and ink blushers from Imagine Crafts. 

Once the flowers are inked, you will need to fold them so each petal has a crease in the center. 

Next, start gluing and layering your flowers. Make sure you stagger them to give our flower dimension. 

Once you get to the last flower, glue and hold in place for a few minutes so that your glue will start to bond and they don't pop apart. Sit flowers aside and let the glue dry completely. 

Fluff your flowers up a little to make them look full, I sprayed mine with some glitter dust, but this step is optional. If you are clipping them on your Christmas tree, glitter looks really pretty when all of the Christmas lights reflect off of your flower. 

Once glitter is dry, you can add pearls to the centers of your flower to make them look complete. 

Cut strips of coordinating paper, ink and then adhere to the top and bottom of your clothespins. 

Finish by adding leaves, flower, a bow and some pearls. 

There you have it, beautiful flowers that can easily clip onto your Christmas tree this year! You don't have to use them for a tree decoration, these could easily double as a home decor item or clip onto a gift bag to hold the to/from tag on. 


Now hop right along and see what Jen Shears has in store for you today! Don't forget to comment on the stops along the way, we've got lots of yummy May Arts ribbons and some Helmar adhesives to give away! 

Alexcia Patterson-Schroll: http://makeandmingle.wordpress.com/

Products Used: 
May ArtsXL31363-09
Helmar- 450 Quick Dry Adhesive
Authentique"Fresh" collection 6x6 Bundle
Imagine Crafts- Memento: Gray Flannel, Summer Sky; Ink Blushers
Therm-o-Web- Glitter Dust: Silver
Kaisercraft- Pearls: Bliss
Wood Clothesepins
Silhouette Cameo 

11/16/2012

Handmade Holidays Blog Hop! Day 1

Welcome to the Handmade Holidays Blog Hop!!!

Calling all crafters! We’ve gathered designers from some of our favorite manufacturers to show you ways to create something from the heart this holiday season. This 3 day Hop includes over 60 stops with inspiration brimming from every corner. Explore all thoughtful and frugal handmade gifts you could make for the holidays, all in one place on this Hop!

If you came here from Michelle Grant's blog, you're on the right track! If not, make sure you start back at the Clearsnap blog and go all the way through the hop! We are showcasig handmade gift ideas, projects,  as well as giveaways that you will find along the way! 

For my project today, I decided to alter a picture frame. I know one of the best gifts you can give is something personal. What's more personal than a family photo in a beautiful altered frame ready to display?!

First, I gathered up my supplies. I had a few of these picture frames laying around. I picked them up on clearance last year at a CKC show. You can also find wooden picture frames at your local craft store for about $1 and they are ready to alter. 

I used paper from Authentique's winter line "Peaceful." This collection is so beautiful and unique. I love that it has subtle hints of green instead of your typical winter blues. 

I started out by making several flowers with my Silhouette Cameo. These particular 3d  flowers are cut files from the Silhouette store by Lori Whitlock, but you can use punches or whatever type of flowers you want. I inked the edges to bring out the hints of green in the paper and then sprayed the flowers with therm-o-web's silver glitter dust. The silver and green leaves are faux suade leaves ribbon by May Arts. 

When I started to alter my project, I knew that I wanted to use this sticker from the "Peaceful" 12x12 Details sticker sheet, so I made it fit i n there somewhere. I also added some burlap ribbon & twine from May Arts. The little wooden snowflakes are the Vintage Wood Snowflakes from Maya Road. I added some Picket Fence Distress Stain to make them white and then sprayed them with glitter as well. 

If you decide to alter some picture frames for gifts this holiday season, have fun with them! These are projects that you can make by yourself or let your kids join in. Don't forget to add a cute family photo so your friends and family have a gift that is ready to display when they open it! 

To sweeten the deal, Authentique Paper is offering a gift for one of you!


Prize Pack will contain the 4- 6x6 Bundles shown above {Festive, Peaceful, Original, & Lovely}

Leave a comment on each blog along the hop to be be entered to win a prize pack from one of the participating manufacturer sponsors (including this great prize pack shown above)! The winners will be chosen randomly from all comments on the manufacturer blogs AND the designer blogs.


Thanks for stopping by today! Now hop right along and see what Emma Jeffery has in store for you! 

Donna Salazar Designs – http://donnasalazar.typepad.com/
Eileen Hull for Sizzix http://eileenhull.blogspot.com/
Kristin Wilson – Graphic 45 - http://www.kristinwilsonhandmade.com/
Jennie Garcia - Tombow - earthyscrap.blogspot.com
Gini Williams Cagle - Hampton Art - http://ginicagle.blogspot.com/
Sabrina Alery – Clearsnap – http://Sabrinaalery.blogspot.com
DeeDee Catron - Globecraft Memories - http://umwowstudio.blogspot.com/
Michelle Grant – Donna Salazar Designs - http://michellejbg.blogspot.com
Emily Lanham – Authentique Paper -http://www.createserendipity.net
Emma Jeffery – Fiskateers - http://hellobeautifulblog.blogspot.com
Natalie Clause – The Twinery - http://www.southernbellescharm.com/
Alberto L Juarez – Graphic 45 http://vintageodyssey.blogspot.com/
Jennifer Priest – Clearsnap – http://hydrangeahippo.blogspot.com
Heather Conklin – Authentique Paper - http://goldiecar.blogspot.com/

11/15/2012

Simple Stories - December Daily Blog Hop!

Welcome to the Simple Stories December Daily Blog Hop! If you came from Donna's blog, you're on the right track! If not, make sure you start at the beginning on the Simple Stories blog so you don't miss a single bit of project inspiration along the way! 

When we were asked to do a December Daily album... I quickly volunteered myself because sure, that sounded like fun! I had no clue what December Daily was nor had I ever done any Project Life type of scrapping. I do however, LOVE the new Sn@p albums from Simple Stories! So this is what I came up with for my cover. 

I also am in love with the Handmade Holiday collection. It's so beautiful! 

I will admit.. the inside of my album is blank. In my defense, I am one of those types of scrappers who has to have photos in order to build the page or album in this case. I figured I would start this album on December 1 and add journaling and photos as the month goes along. At the end of 2012, I will have an album full of photos and journaling from December to pull out next year and look back on. 

These albums are soooo great for this type of project! Along with the 3x4 Sn@p cards and Countdown Cardstock stickers, this album will come together pretty easily. 


Now hop right along and see what Gail has in store for you today! 

Give Thanks!

With Fall in the air and Winter right around the corner, I figured what better time than now to get some Fall crafting finished before it's too late! 

I LOVE the Autumn Melody stack by DCWV. It's beautiful. The warm, right colors just make you want to go outside and look at all of the beautiful colors. 

I made a little card using the Autumn Melody mat stack and some of the epoxy stickers. 

I think it's a perfect gratitude card! I love the gold foils in some of the papers that are in this stack! Simply elegant! 

I didn't stop there!!! Make sure you stop by the May Arts blog later today to see this project that is loaded with lovely ribbon and DCWV papers! 

11/08/2012

Sweet Stamp Shop November Release:Day 3!

Welcome to Day 3 of Sweet Stamp Shop's November release! If you came from the Sweet Stamp Shop blog, you're on the right track! 

Today's new release set is called "Afternoon Delights" some of you may have seen this set or already have the set if you subscribe to the Paper Made Bakery kit club. It's a really adorable set! 

I like to drink tea, I also love to try new flavors of tea. I know this time of year, people get sick with a cold or sore throat, so I thought that it would be cute to make a little gift bag to give with a couple of different flavored tea bags inside. 

Here's a close up of the cute little tag.

Now hop along to see what Michelle has in store for you today! 

11/07/2012

Sweet Stamp Shop November Release: Day 2!

Welcome to Day 2 of Sweet Stamp Shop's November release! If you came from the Sweet Stamp Shop blog, you're on the right track! 

Today's new release set is called "Simple Sentiments" and I have a feeling that I will be getting A LOT of use out of this set!

My daughter's birthday is in a few weeks, so I thought I would go ahead and make a tag to stick on one of her gift bags. She LOVES purple.... and I love teal, so I used that for my inspiration and added in some lime green to make it "pop!" 

Can yu tell that I am totally loving these dylusions mists? I have been using them on almost every stamping project lately! 

I also loaded my little tag with LOTS of ribbon from May Arts! I love all of their ribbons, so easy to just add to a project and great to embellish with! 

Now hop along to see what Kari has in store for you today! 


11/06/2012

Sweet Stamp Shop November Release: Day 1!

Welcome to Day 1 of Sweet Stamp Shop's November release! If you came from the Sweet Stamp Shop blog, you're on the right track! 

Today's new release set is called "Get Fit" and it fits right in with the direction that I am going with my lifestyle! 

So for today... I made a project that I could use on my journey...

I have a bunch of SMASH books laying around that I have yet to alter... so I grabbed up the Green "Eco" smash book and altered the cover. I really liked all of the pages inside and they felt like they would go with this type of book. I cannot wait to get started on the inside! Now I will have a keepsake to look back at my journey, because as we all know, losing weight and changing your lifestyle IS NOT an easy thing to do! 

Now hop along to see what Misty has in store for you today! 


11/02/2012

In ♥ with Neon Chic!

Happy Friday to you all! I've had a rough week, I've been under the weather so crafting has been a challenge for me. However, I'm on the mend, so everything is looking up! I was able to get a few projects finished to share today. 

Since I was feeling kind of down from the weather and being sick, I reached for my DCWV Neon Chic stack and I fell in love! This stack totally fits my style and my personality and I love all of the bright fun colors! If you don't own this stack... you should! The creamy smooth texture of the paper is amazing! 

I made this layout with a little instagram pic that I took of my daughter on her very first school picture day this year for pre-school. I love the little instagram pics, they are great for a quick layout! 


When I finished the layout, I realized something was missing... so I got out some neon washi tape and started playing...

Viola! Washi tape flowers! How cute are these?!? They were so easy to make! I can't take credit, I did find a video on youtube, but still... they turned out pretty adorable! 

Of coarse, I wasn't done playing with Neon Chic! I had to make something with my scraps! 

I painted some toilet paper rolls with my neon acrylic paint because I wanted to make a fun little tp roll album. The paint was kind of sheer so I had to add several coats. 

Isn't this the cutest? I LOVE the new Geek Chic stamp set from Sweet Stamp Shop! 

None of my albums would be complete without the addition of LOADS of pretty ribbons from May Arts! Always one of my favorite ways to embellish... lots of ribbons!

Thanks for stopping by today! I hope you all enjoy your weekend!