6/30/2011

Flair & Frills Birthday Blog Hop!


Welcome to the Flair & Frills Blog hop! We are having this 3 day hop in honor of Brynn's 30th Birthday! Happy Birthday Miss Brynn! If you were just browsing and stopped by my blog today, please start at the beginning of the hop at Brynn's Blog and check out all of the fabulous projects using Brynn's favorite colors, pink,black, white, and silver!

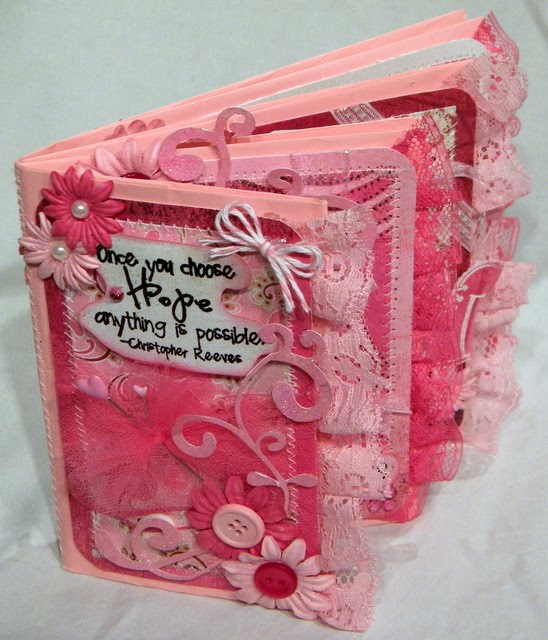
For my project today, I made this cute little birthday card:

For the background, I used the Zebra Background stamp from Pink by Design and for the sentiment I used Pink by Design's new stamp set Flirty Girl. I thought these stamps would go perfect for this card! For the flourish by the flowers, I use the Fancy Flourish collection from Little Scraps of Heaven Designs.


I had a lot of fun making this card, it was my first time using background stamps, so I did have a little trouble, but I think I like how it turned out! Pink & girly is always a fun theme to work with! :-)

Now keep hopping and see what fabulous birthday surprise Cheryl has in store for you today!

And here is the full lineup for the hop:
Brynn http://flairandfrillscreativity.blogspot.com
Elizabeth http://www.217creations.com
Nicolette http://beyondscrapin.blogspot.com
Lisa http://scrapaholic22.blogspot.com
Theresa http://www.thescrapbookingqueen.com
Michelle http://michellegranger.typepad.com
Emily http://www.createserendipity.net
Cheryl http://www.capturingamomentintime.com
Alyssa http://www.mythoughtsexactly.com
Sylvia http://bellascrapbookdesigns.blogspot.com
Sandra http://365daysofcricut.blogspot.com
Rachel http://dillybelle.blogspot.com

6/28/2011

Sketch Challenge #3


I was playing with my stamps tonight and decided that I wanted to play along with the Sketch Challenge over at Market Street Stamps. I just love their stamps and their challenges are a lot of fun!

For the challenge this week you are required to follow a sketch AND add glimmer spray to your project.

I do own about 5 bottles of glimmer mist and I am always afraid to use it! So I watched a little video on how to use glimmer mist and learned I was doing it all wrong! You DO NOT shake your glimmer mist! Apparently that clogs the sprayer and that's why sometimes you get bubbles on your paper. I guess it's simple, you just have to gently swirl it before use!

Here is the card that I came up with for this challenge:

You can't see it too well from the photo, but I used glimmer mist on the swimsuit and also added some stickles to it as well.

For this card, I used the Chillaxin stamp set from Market Street Stamps. I also used the Scalloped Shapes from Little Scraps of Heaven Designs for the scalloped background behind the swimsuit.

I don't know if it is because I have been busy packing getting ready to move, or what, but my creative mojo has been lacking today! I hope you all like this little card and thanks for stopping by! :-)

6/27/2011

Made it Myself Mondays & a Giveaway Contest!!!


Happy Monday everyone! Thanks for stopping by to see my"Made It Myself Mondays" challenge project! I'm VERY excited to share this with you today... it's actually one that I posted here before, but I wanted to also share a tutorial with you all!

First... do you all remember the little toilet paper roll album that I did a few weeks ago? Well... I entered it in the American Craft's Flair contest and I got selected as one of the contenders for the grand prize this week! I will offer up another giveaway to one lucky winner that will be chosen out of EVERYONE who votes for me.... All you have to do is "Like" American Crafts on facebook HERE and then you HAVE to go to the photo of my little album and click "like" under the photo so to go to the contest to vote, CLICK HERE! That's it! It's simple!! I can use all the votes you can give me, so share with your friends and family as well and let me know that you did so and I will give you an extra chance in my little drawing... How about I give you a DIY Album kit of your choice? Sound good? Voting ends THIS FRIDAY, so please vote! :-)

Ok, now on to my project...

Here is the album that I posted a few weeks ago in THIS POST.

And here is how you can make your very own!

First, get out your supplies. I saved toilet paper rolls for a little while so I would have enough to try this type of album. I ended up using 4, though you can use more or less. Take your bone folder or your hands, either works, and flatten to toilet paper rolls.

I chose a couple of bright summery colors to paint mine with. You can use just any acrylic paint, the kind I used is by Making Memories. I just painted both sides of the toilet paper rolls and let them dry. I use the little sponge paint brushes, they are usually on sale for next to nothing at craft stores! I also use old boxes to paint on in case you were wondering, it’s easy to clean up! :-) This step is completely optional, if you want more of a vintage look, you could leave them plain.

Next you need to choose your paper for your album. I chose paper from the Heat Wave collection by American Crafts. I also chose plain cardstock to mat the papers on, this is completely up to you, I just like that extra edge around my projects. The mats were cut at 4 x 2.25 inches and the patterned paper was cut at 3.75 x 2 inches. Make sure you measure your toilet paper rolls to get the best measurements for your paper. I found by doing this that different brands of toilet paper have different sizes of toilet paper rolls, that’s something new to me! I cut out enough to have 12 mats, 1 for each page and 4 pull out tags.

This step is completely optional, but some have asked me how I get do the stitching on my projects. Well, I use a regular sewing machine! I stitched one end of each of the toilet paper rolls with a straight stitch and then stitched all of the mats with a zig-zag stitch.

After you’ve done all of that, take your crop-a-dile or a regular hole punch and punch a couple of holes in the ends of your toilet paper rolls. If you stitched them, make sure you punch the holes on the stitched end, you need to leave the other end open for your pull out tags. Assemble your album together with binding rings, I used 3/4 inch, but if you use more toilet paper rolls, you might want to go a little larger on these. I buy all of my binding rings at an office supply store, you can buy them there in bulk :-)

Glue down your mats to the toilet paper rolls. I used my atg because it gives a really good stick for projects like this.

Now for the fun part! I added ribbon to the binding rings and also stapled a couple pieces of ribbon to the ends of the pull out tags. In case you were wondering why I have a lighter sitting there… well, I always heat set my ribbons so they don’t fray. You can buy fray-check from the store, but I think it’s a little more time consuming, so I just lightly burn the edges of my ribbons. Be careful though! Some ribbons are more flammable than others! You don’t want to catch your project on fire, so use caution!

I wanted a bright & cheery summertime album, so I found some patterns of a sun and some clouds. These svg patterns are from Little Scraps of Heaven Designs. I also got out my stamps and embossing powders, for this project I used the Summer Vacation stamp set from Pink by Design.

After I stamped my sentiment, I wanted to add a little something extra to the clouds. I used a Quick Glue pen and some doodlebug glitter to add some dazzle around the edges.

Now it’s time to embellish! I absolutely LOVE to add flowers to pretty much everything I make! They are a great embellishment and can really dress up a project! After many years of wasting $ on expensive little glue dots, I discovered that a hot glue gun is one of the most essential tools that every scrapper needs! I use it to glue down all of my embellishments except the ones that I choose to make 3-d with pop dots.

After you’ve got your cover finished, you can add little elements to the inside of your album. I used some of the chipboard elements from the Heat Wave collection that matches the paper I used. I also added some flowers throughout. Don’t over embellish these pages though, the mats are relatively small and it might be hard to add photos if you add to much!

And there you have it, my mini album made out of toilet paper rolls! One cool thing about this project is that you can dig into your scraps and make this album completely from scraps! It’s a good way to use up materials instead of throwing them away.

Lastly, I need to make a little announcement... remember the post I made the other day about my "Believe" cards and the Scrapbooks, etc contest? Well... I WON this past week!!!! What that means is each week they have a weekly voting contest over at Scrapbooks, etc for their Craft It Forward program, at the end of each week, there is one winner. I am the winner from last week. So at the end of the month, Scrapbooks, ETC will pick one of the winners from the weeks that month and they will win the grand prize which is $ for Charity! So I hope and pray that they pick me because I would love to give some $ to the Bradley Angel House! Now those of you who voted, I promised a little giveaway. make sure that you post on my facebook page or let me know that you voted (if you commented here, I got ya!), I will do a giveaway later this week or possibly next week (we are in the process of moving so it could be a few days)

6/25/2011

PLEASE Help by Voting For Me!!! (There might be a little prize if you do!!!)

If you are looking for the Beach Party Blog Hop CLICK HERE

Hello everyone!!! I am posting this blog post to ask for your help! I need help from every single one of you!

Do you remember this set of cards that I made a few weeks ago?

Well, these cards have made it as one of the Top 4 on Scrapbook Etc's Craft It Forward contest this week! This is a contest for charity, so if I win, the prize $ will go to the Bradley Angel House for women who have suffered from abuse and domestic violence. I am currently in 2nd place, but there is 1 day left to vote for the week! PLEASE go and vote for me! You can vote once per browser per day (but I have been able to vote more than once on some days!) Share it on your facebook walls, ask friends and family to vote, etc. Just whatever it takes!

CLICK HERE to vote!!!

Please leave me a comment letting me know that you voted, and IF I make it to 1st place, I will give one lucky voter a little prize pack. I think that I will make it a nice prize pack and give 1 DIY album kit, a couple of blank albums... AND a mini album made by me :-) Does that sound good? Ok, well... what are you waiting for? GO VOTE!!!

Thanks everyone!

Beach Party Blog Hop!


Welcome to the Beach Party Blog Hop! We are having this hop to kick off the Summer and share with you some fun Beach themed projects! If you've arrived here from Erika's Blog, you're on the right track! If you are just stopping by my blog today and would like to see all of the fabulous projects in this hop, please start at the beginning on Abby's Blog. This is a 2 day hop, so if you don't make it all the way through the hop today, make sure you come back tomorrow to finish hopping! Abby is offering up lots of blog candy for those who hop through and leave comments on every blog!

For those of you who know me, you know that the beach is my favorite place on earth! I could live there! This past September, my husband and I too the kids to the Outer Banks, North Carolina and had a honeymoon BEFORE our Beach wedding. I know, sounds odd, but we had the week prior to the wedding off of work, so we decided to take a little vacation. I love North Carolina, but had never been to the Outer Banks prior to this trip. Wow. What a beautiful vacation spot! No wonder it is a tourist hot spot! We were there the week after Labor Day, so most tourists had cleared out and it was pretty nice. There was always something fun to take the kids to do there, and my favorite part was being woke up by the sunrise over the ocean every morning shining in my window.

While we were there, I went to a little Beach Memories scrapbook store and found some great papers and embellishments. Finally, I had the perfect project for them! So for today's project, I decided to make one of my cascading paper bag albums, but I wanted to do one for myself with my own photos. I rarely scrap my own photos, but this strip was very special to me, so this hop was the perfect excuse for me to scrap my trip :-)


I had to hold the album to get a good photo because it kept popping open. I tend to load my albums with embellishments most of the time!


Brandon bought a boogie board and had a lot of fun "catching waves." This was the first time that the kids had seen the ocean and they were simply amazed!

I also added little pull out tabs so I could fit a few more photos in my album. This photo is of my daughter Reagan getting her first glance at the ocean. She just kept staring. I'd say it would be something quite amazing for a 3 year old to see for the first time!

We took a trip down to Okracoke Island, which is about a 60 mile drive but takes several hours to get there because there is only 1 road that runs through the Outer Banks and also, you have to take a ferry ride to get down to the island. On the left is us on the ferry, and the right photo is Reagan and I playing on the beach at Ocracoke Island.

The kids had a lot of fun playing in the ocean and looking for seashells.

And there is the beautiful sunrise that I was talking about earlier! See why it's my favorite part?

And here are the kids playing in the ocean at Okracoke Island. As you can see, they are having a blast!


And after a whole week in the Outer Banks... we drove down to Sunset Beach, NC and got married :-)

So... to say that I love the beach is just an understatement :-)

Thanks so much for stopping by! I'm glad that I got to share some of my own personal scrapbooking with you all today!

I don't have any blog candy to offer here on my blog today, but make sure you check out all of the blogs and leave comments because Abby has some candy for some lucky winners who hop with us!

Also, if you are looking for some steals and deals, I am having a moving sale (yes, I am sadly moving next week and need to downsize on my inventory) in my etsy shop! Just enter code MOVING20 at checkout to receive 20% off your entire purchase!

Now hop along and see what Christine has in store for you today!

And if you need the whole lineup, here it is:
Abby http://www.scrapbookaholicbyabby.com
Sandra http://365daysofcricut.blogspot.com
Pammejo http://pammejo-scrapbookflair.blogspot.com
Michelle http://www.scrappinwithmybug.com/
Meighen http://scrappin3rdeeschik.blogspot.com
Maria Elena http://mariaelenaworld.blogspot.com/
Liz http://www.lizspaperloft.com/
Kristin http://pinkldycrafter.blogspot.com
Kim http://rickettscricuts.blogspot.com/
Karla http://kalittlescrapcorner.blogspot.com
Gaby http://www.gabycreates.com/
Erin http://www.erinleecreative.com/
Erika http://cricutlove1.blogspot.com
Emily http://www.createserendipity.net/
Christine http://scrapbookingtechnique.blogspot.com
Celeste L http://touchedbyabutterfly.blogspot.com
Celeste B http://ccscards.blogspot.com
Carley http://the-real-icarley.blogspot.com
Candace http://papercraftsbycandace.blogspot.com/
Angelica http://www.handmadebyangelica.com/
Amber http://stayingcrafty.blogspot.com
Ashley http://myscrappinpalace.blogspot.com
Alina http://neverstopscrapping.blogspot.com

6/24/2011

Fairy Day Blog Hop


Hello everyone, welcome to the Fairy Day Blog Hop! This hop will gon on today and tomorrow, but I will only be participating for today. This is a 2 day hop so even though I am not participating on both days, I encourage everyone to stop by tomorrow and check out the hop starting at Gill's blog.

The theme of this hop as I've mentioned is Fairy Day, so what we are doing on this hop is bringing together a select few people from all over the world to take part and for them to create a project with a fairy or fairies on it.

This is a hop with a difference than other hops... along the hop there are letters to find in the postings - not all blogs have the letters but if you gather all the letters then at the end of the hop on day 2 assemble them to create a fairy related word. If you then return to Gill's blog and enter the Mr Linky at the bottom of the post. After the hop, Gill will contact someone at random and ask them to email her with the word - if correct they win some lovely blog candy.

For today's project I have a set of fairy bears from the Little Scraps of Heaven Designs Fairy Bear Collection. I used Graphic 45's Once Upon A Springtime paper line for the little dresses on the bears and also used one of the pieces of paper for a background to lay the bears on, they fit right in like they were placed in a scene!


Thanks for stopping by today! Now head on over to Janice's Blog and see what projects she has in store for you!

Here's the full lineup for this hop:
Gill – http://creationsbygillm.blogspot.com/
Alethea - http://lilodesigns.blogspot.com/
Emily – http://www.createserendipity.net
Janice – http://www.cricutconfessions.com/
Denise - http://vintageheartfeltdesigns.blogspot.com/
Linda – http://thefruitofmyhands.blogspot.com/
Anita – http://anitaandbugs.blogspot.com/
Leslie - http://leslierahye.blogspot.com/
Jackie - http://jackiesscrappinpad.blogspot.com
Amanda - http://ajsarts.blogspot.com/
Theresa - http://www.thescrapbookingqueen.com
Shannon - www.purplelionpaper.com/blog
Haidee - http://created2bunique.blogspot.com/
Maria - http://justgetscraphappy.blogspot.com/
Jacki – http://cardsbyjacki.blogspot.com/
Jenn R –http://www.memorieswithjen.blogspot.com/
Cynthia - http://cynchronicity.wordpress.com/
Valerie – http://canonburycreations.blogspot.com/
Dawn - http://dawnsdesignsthatdelight.blogspot.com/

6/22/2011

Save The Tatas ♥

It seems like forever since I have actually made it up to my craft room to create something! Finally, I was able to get up there and craft my heart out yesterday!


Last night on my facebook page, I shared this teaser photo of what I've been working on.... and you guessed it! A Breast Cancer awareness album! Last month's Pink by Design stamp releases included the 2 beautiful stamp sets Save The Tatas and Breast Wishes. There are also SVG files to go along with the Save The Tatas set.

This is my 2nd project that I have done with Pink by Design stamps since being on the Design Team and I must say, I am in LOVE with all of the PBD Stamp sets! They are so much fun to work with!!! I fell in love with these sets as soon as I saw them and I knew exactly what I would make with them, so here it is, my "Pink" cascading paper bag album :-)


And if you are interested in learning how to save $ on glitter paper and make your own glittery SVG files or Cricut cuts, CLICK HERE to see my post on the Pink by Design blog today with a tutorial!

And as always, this album will be listed in my Etsy shop sometime today.

6/20/2011

Made It Myself Mondays!


Happy Monday everyone! I've got a little post today for the "Made It Myself Mondays" challenge!

I've been pretty busy over the past week so I apologize for the lack of blogging! My sister-in-law got married over the weekend and I was able to put some of my crafty skills to good use while I was there!

When I got to the lake where the wedding was held, my sister in law handed me a big box of stuff and said "Get To Work!" lol So I started in.... I ended up making these really pretty hanging flower pots. The wedding colors were beautiful!


A few days before the wedding, we used my new Cricut Cake machine to attempt to cut some fondant for the cake... this was my first time doing it, so It wasn't the BEST that I could do, but it worked!!!


Unfortunately, the fondant letters broke apart when they tried to put it on the cake, but the handmade cake turned out BEAUTIFUL with or without the letters! :-)


They even asked me to be their wedding photographer, so I attempted to use my photography skills that I learned in college several years ago!


Thanks for stopping by today! :-)

6/13/2011

Color Cue Challenge #3


Each month Market Street Stamps sponsors a color cue challenge. I decided to give it a try this month because I love challenges! They always help me think outside of the box a little!

This challenge was particularly hard because it's based on a specific color scheme... here is what I had to work with:


And here is what I came up with:


I used the Fashionista stamp set from MSS as well as the Ooh La La pattern collection from Little Scraps of Heaven Designs.

I hope you enjoyed my little project! I look forward to doing more challenges in the near future! They are a great way to get motivated! :-)